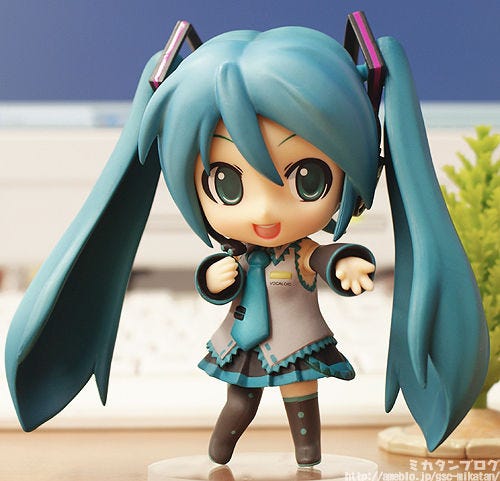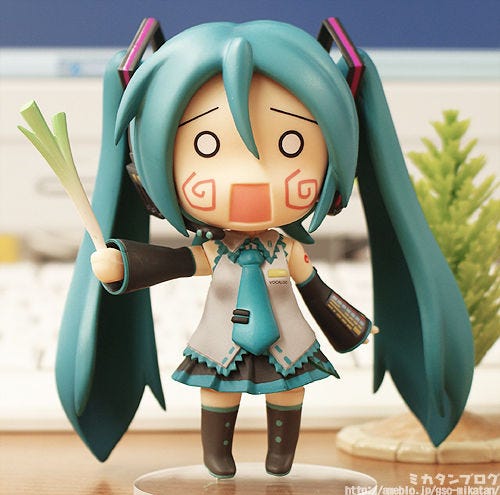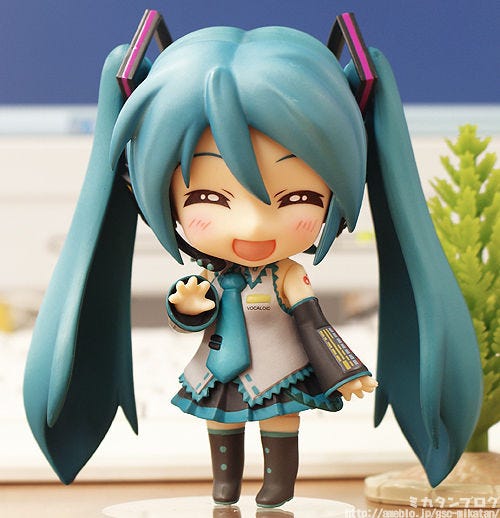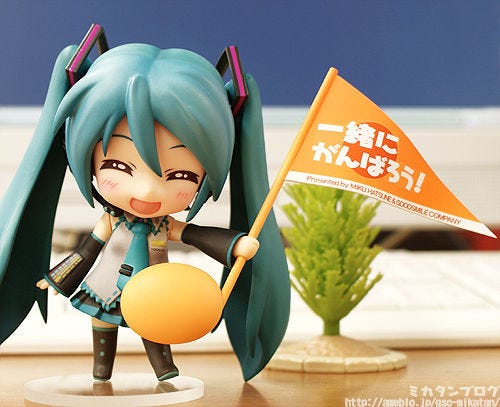
Nendoroid Nemu Asakura

Koyamada has been keeping figures aside for me!

025

     / ̄ ̄\
   / .ー  ー \
   | (●) (●) |  ← Koyamada
   |  (_人_) |
   |   `i  i´  |   ”I thought you’d want to use them
   |   . `⌒   }         for your blog”
   ヽ       }
    ヽ     ノ
   /      ヽ 

He always keeps some aside for me like this! How can I ever repay you, Koyamada!!

027

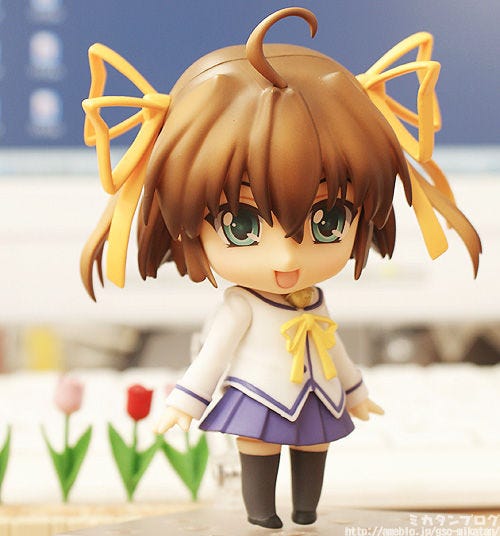
Today I’ll be taking a look at:

Nendoroid Nemu Asakura!

Nemu is the main heroine in the romance adventure game ‘D.C ~Da. Capo~’, which was recently also released on PSP!

026

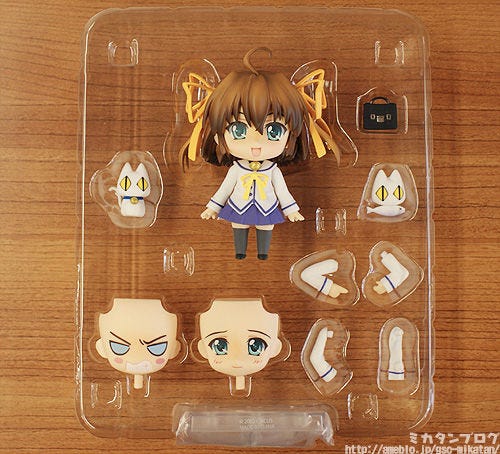
This is how the packaging looks!

A total of three expressions.  (・∀・)ノ

She also comes with the Da Capo mascot ‘Utamaru’ and a bunch of extra arm parts!


028

This is how she looks from the back!

The trademark yellow ribbon in her hair can be moved backwards and forwards!

As you can see, Nemu makes use of the popular ‘arm-type’ stand!
029

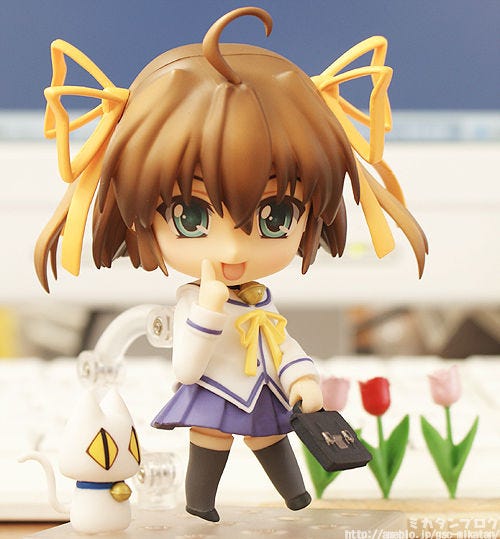
Onto the optional parts!

A bent left arm, a pointing hand and her school bag!

This set of parts recreates the atmosphere of Nemu heading toward school! She also comes with the D.C. mascot, Utamaru…. and even though he is absolutely tiny, his neck is still posable!

030

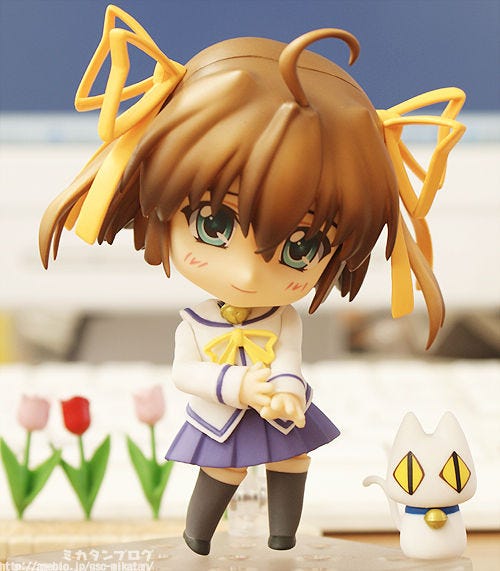
A blushing, smiling face!

It’s a little boastful for me to say it… but I really think I got this posing and photo perfect! Don’t you think it looks adorable?!
This pose also uses a different bent left arm, which creates a nice embarrassed looking pose like this one! You can also pose her combing her hand through her hair by twisting the left arm upwards!

031

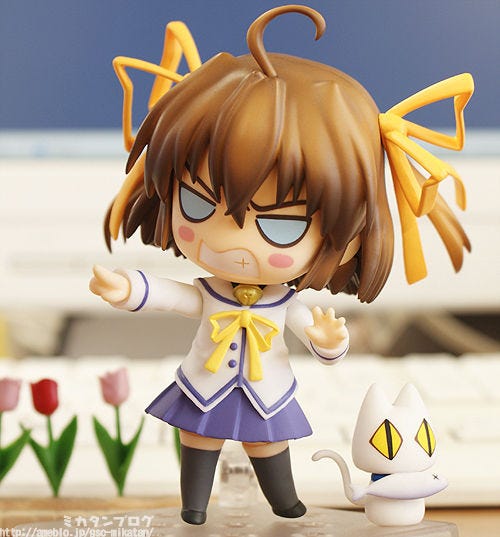
The AFTER BANANA Face!

This is the face Nemu has in the mini game called ‘AFTER BANANA’. This is an expression for the fans! ^^

032

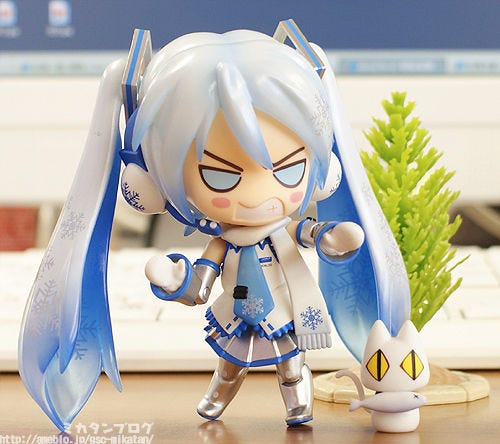
It also suits other characters quite well!

       / ̄ ̄ ̄\
     / ─    ─  \
    /  <○>  <○>  \.   ”It really gives a different
    |   (__人__) し |     feeling compared to other expressions…”
    \    |r┬-|    /
    /  し  `ー’´     \

Even Utamaru comes with an extra expression!

He comes with an extra face eating a fish!
033
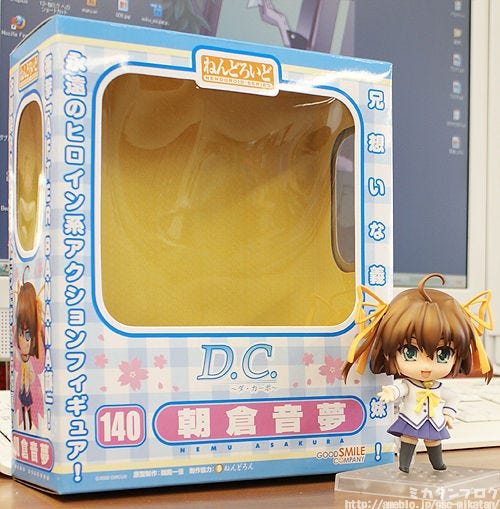
Nendoroid Number 140!

The box is decorated in true D.C style with cute spring colors!

Nendoroid Nemu Asakura!

   / ̄ ̄\
 /   ⌒ ⌒\
 |    ( ●)(●)                ___
. |   ⌒(_人_)            /      \    ”Nemu Asakura, Please!”
  |     |r┬-|           /─    ─    \
. |     `ー’} \       / (●) (●)      \
.  ヽ        }    \    |   (__人__)      |
   ヽ     ノ       \   \   ` ⌒´     _/
   /    く. \      \  ノ           \
  |     \  \    (⌒二               |
    |    |ヽ、二⌒)、      \         |  |

She is already on sale!

Deliveries to certain areas cannot be made due to the recent earthquake, but as soon as possible products will be sent out.

For ordering details or questions please check out our partner shops.

All of our future products may be delayed due to shipping problems, planned blackouts and circumstances with the shipping companies, but we will strive to keep them all on the same schedule they are currently on. It’s hard to determine how things will turn out in the current circumstances, we hope everyone will understand!

It’s finally Spring!!
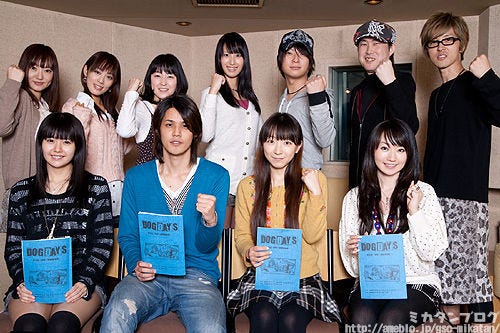
April is here, which means a new anime season is upon us!

035
I got the chance to visit the dubbing session for the upcoming anime ‘DOG DAYS’, which is made by the same team that did Lyrical Nanoha!

Animation is done by Seven Arcs with original work and scenario created by Masaki Tsuzuki! It’s the perfect team for a great anime!

Not to mention that I even managed to get some comments from some of the cast!

 Mamoru Miyano playing the role of Shinku Izumi
Yui Horie playing the role of Millhiore. F. Viscotti

Thank you for finding the time during your busy schedule!!

While playing your characters, what parts of the characters have you found the most interesting?

Miyano
Shinku is a 13 year old middle school student, but when I’m voicing him I was told I should worry less about the age and should focus more on speaking with spirit. He has a really strong will and it’s conveyed through his words very nicely.Personally I also like the fact that he is portrayed as a real ‘hero’ should be. When something needs to be done, he does it, and he has the typical hero characteristic of wanting to protect others. I think that straight appeal as a hero is a great point to him.

On the other hand, he is also a little clumsy, and has his fair share of scenes such as bumping into Eclair or peeping in on the princess while she is bathing, or accidentally ripping Eclair’s clothes…. on that end that clumsiness is fairly fun as well. All in all I’m certain he is a character everyone will enjoy watching!

  Horie
Millhi-chan has a very pure and gentle personality which I find very cute. Whenever the team wins a battle she sometimes bursts out in song, which I think is a very appealing part of her character. I’m sure if there was a concert for her she would be singing for everyone.


Thank you for your wonderful comments…! (´;ω;`)

Really, thank you so much! I want to bow down in thanks in front of my monitor… I know you are both very busy!!

DOG DAYS starts on 2nd April!

■ April 4th TOKYO MX: 23:30  /  Tochigi TV: 23:30 /  Gunma TV: 23:30
April 5th MBS: 2:28 /  Chiba TV 1:00 /  tvk: 1:30 / Dere Ou: 1:35
■ April 7th CBC 2:30
■ April 9th BS11  11:30(Please note that some times and dates may change)

There are also already figures in the works!


Be sure to give it a watch!!

That’s all for today.
I hope to see you all again tomorrow!! (・∀・)ノ゛

(C)2002 CIRCUS
1/8th Scale Nessa

Yet another new figure to play with!  (・∀・)ノ
001
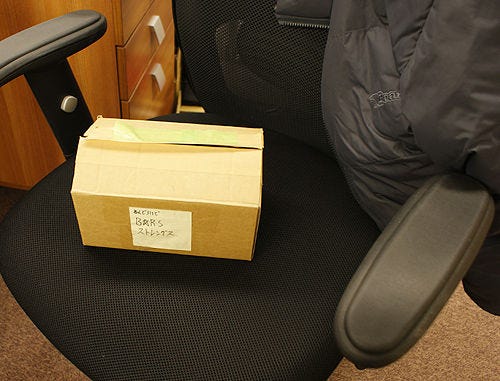
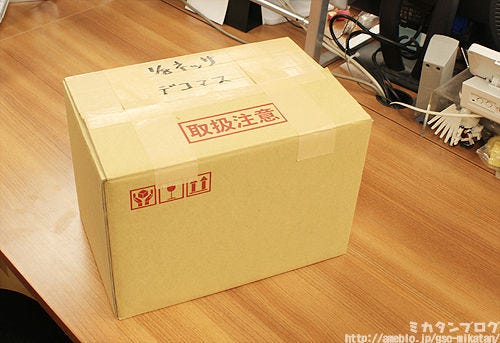
The label on the box reads ‘handle with care’… They just have to add to the pressure…

But I shall not be stopped! I need to play with her!!


002

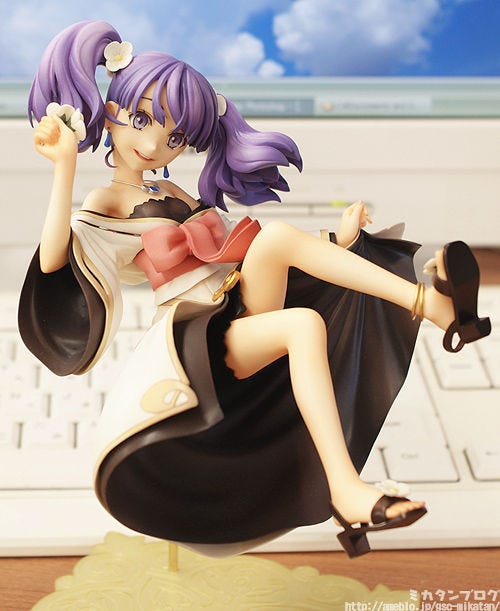
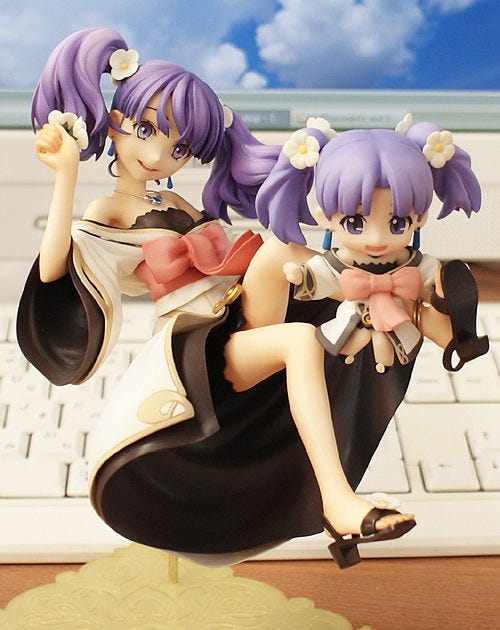
1/8th Scale Nessa!

Nessa is a character from the fantasy adventure anime, Fractale directed by the famous Yutaka Yamamoto! She’s a mysterious girl who came out of a bracelet left behind by another character, Phryne.

         ____
      /::::::─三三─\
    /:::::::: ( ○)三(○)\    “Eeeeeh!?
    |:::::::::::(__人__)::|    Her hair is the wrong color!
     \:::::::::  |r┬-|   /    Nessa has red hair in the anime!”
    ノ:::::::::::: `ー’´ \  

Some of you might not be aware, but…


011
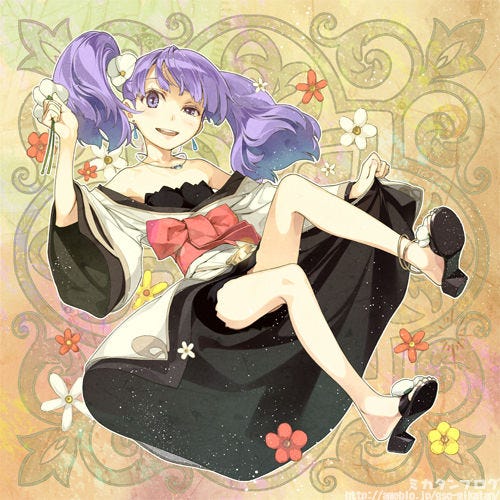
The figure is based of Hidari’s original character design that featured in ‘Shisou Chizu Beta vol.1″!

This is in fact the original design of Nessa! Don’t you think the purple hair looks really great on her!? The red-haired Nessa from the anime is super cute, but the purple hair gives her a more mature look!


004

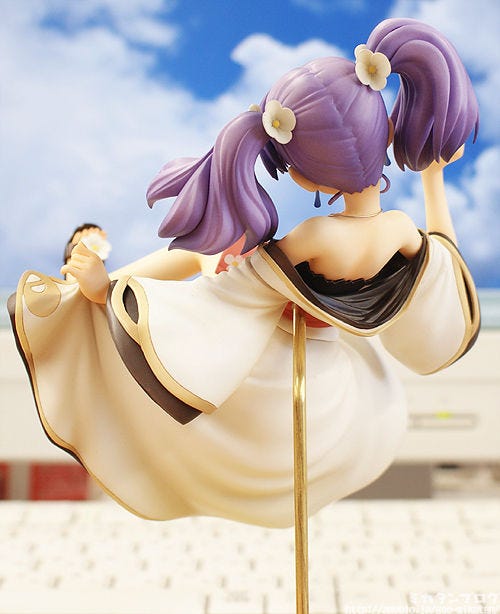
This is how she looks from the back!

The first thing you notice is how incredibly dynamic the posing is! Her robe is fluttering all over!

It’s quite a challenge to create a figure like this that doesn’t actually have any part of the figure touching the ground, but this one has been done beautifully.


003

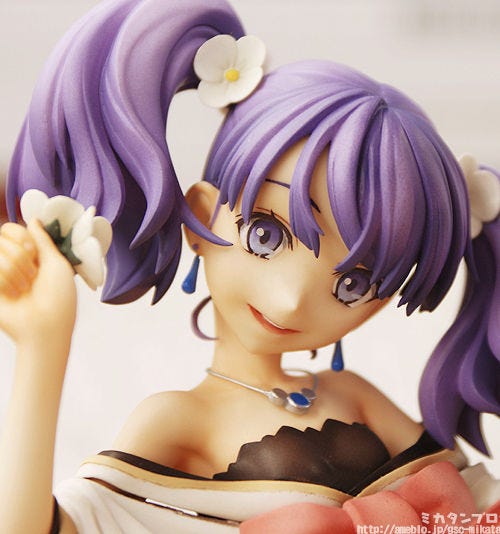
Nessa’s innocent smile!

Plus she has such beautiful eyes!! You can really feel the purity and innocence of Nessa’s character through the figure!


005

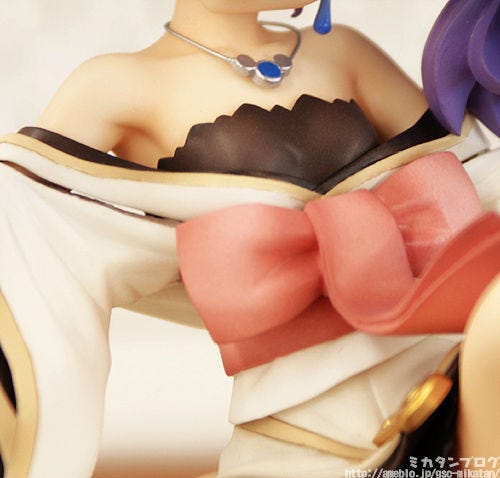
She has some very unique clothes!

The way it opens out at the breasts and slides down to show her shoulders really adds a nice sexy appeal to the figure… plus if you look closely at where the sleeves are drooping down you can see a little gap showing off her armpit! Excellent! 🙂


008

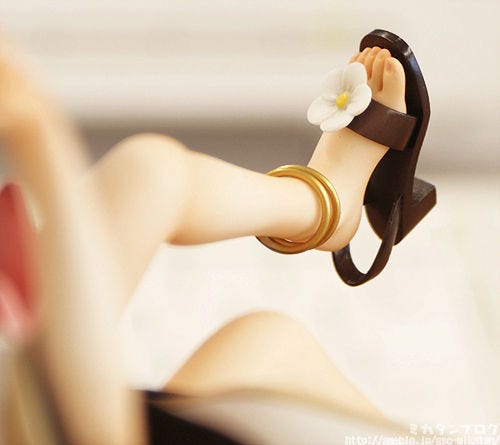
Even her toes are carefully detailed!

The way her shoe is half falling off is strangely captivating… I really like this photo.  Whilst I am a fan of bare feet, something half-way there like this is probably even better in my opinion. (I hope some people agree with me… ^^; )


007

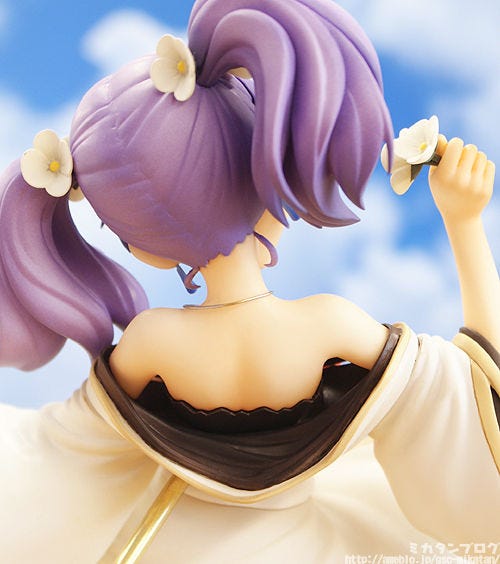
Her silky smooth back and neck!

Her arms and neck look very thin… but it really suits her perfectly. Her twin-tailed hair has also been sculpted in such a cute way!


009

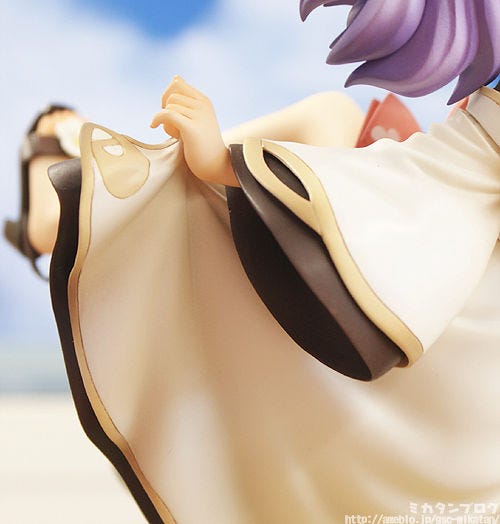
Her robe actually has two layers!

This really shows off just how close to the original the figure really is! Now I just hope the production team can get the same quality on the final release!

006

 
Service Shot!

     ____
   /      \
  /  ─    ─ \
/     (●)  (●) \
|       (__人__) |
/     ∩ノ ⊃  / ∩ノ ⊃
(  \ / _ノ    \/ _ノ
.\ “  /  . \ “  /

010

1/8th Scale Nessa!

Her miniature version – a Nendoroid Petitie Nessa – will be an extra that comes with the Fractale Vol.1 Blu-ray disc, which releases in April! If you get them both,  you can display them together to create the cute scene above!

         ____
       /      \
      /  ─    ─ \
    /    (●)  (●)  \
    |     (__人__)   |  ________
     \      |r┬-|   ,/ | |            |
    ノ      `ー’´  \  | |           |
  /´                 | |            |
 |    l                | |            |
 ヽ    -一ー_~、⌒)^),-、 | |_________|
  ヽ ____,ノγ⌒ヽ)ニニ- ̄   | |  |

She will be on the GSC website from tomorrow!

For ordering details or questions please check out our partner shops.

All of our future products may be delayed due to shipping problems, planned blackouts and circumstances with the shipping companies, but we will strive to keep them all on the same schedule they are currently on. It’s hard to determine how things will turn out in the current circumstances, we hope everyone will understand!


That’s all for today!
I hope to see you all again tomorrow!  (・∀・)ノ゛
 
 
* Please note that this blog’s contents is originally written for a Japanese audience and is then translated for our foreign customers. All pre-order and release dates are the Japanese dates. Also note that not all products can be sold in certain areas

(C)フラクタル製作委員会

Nendoroid Strength

Hi everyone.

Good Smile is doing there utmost to keep releases and announcements up to date, but things like transportation problems may get in the way, so bear with us if some things get delayed!


001

Of course, I’m trying to keep the blog up to date too!

In the hopes that I can bring a smile to everyone who reads it!


003

That said, let’s move onto today’s figure review!
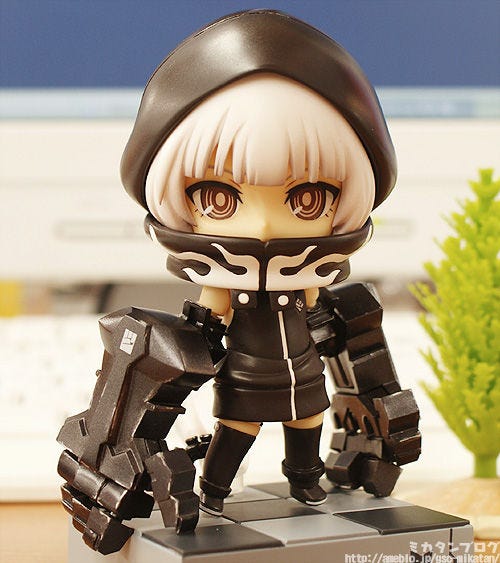
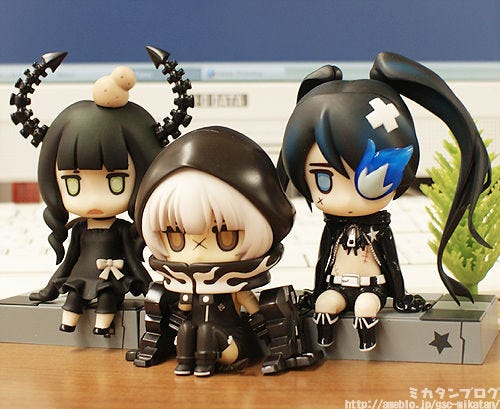
The 4th Nendoroid in the BRS series:
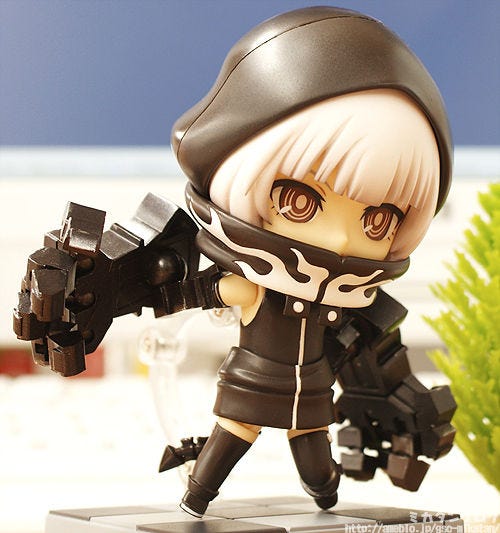
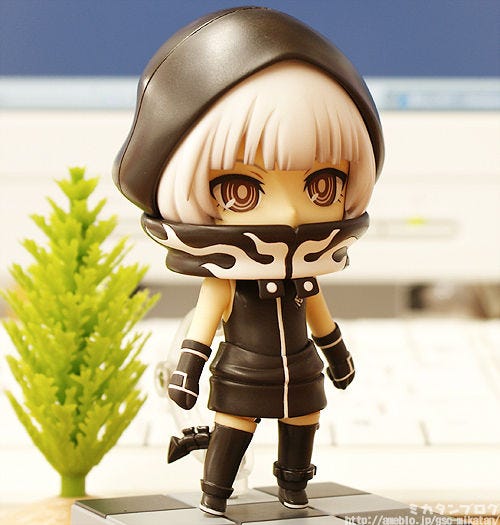
Nendoroid Strength!

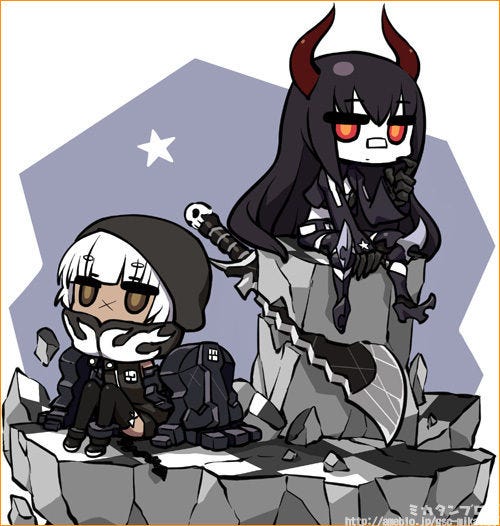
Strength is a mysterious character that featured very briefly in the Black Rock Shooter anime – she was watching over one of Black Rock Shooter’s fights. Just like the previous Nendoroids from the Black Rock Shooter series, she also comes with a huge weapon! This time some very unique weapon at that!!


004

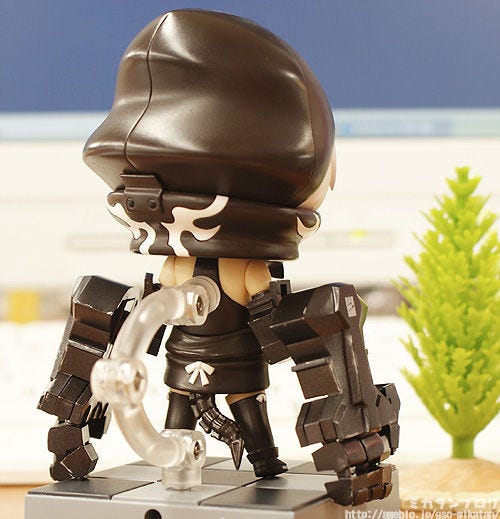
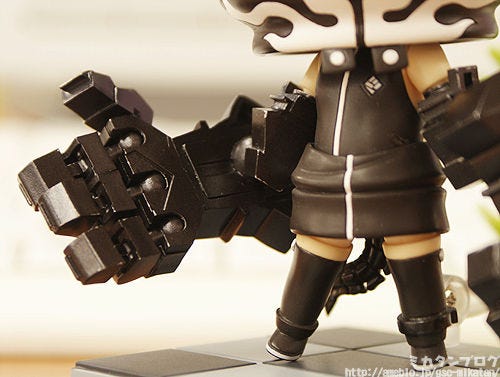
This is how she looks from the back!

If you look at the bottom you’ll notice she also has a little tail! Does anyone remember the tail…? ^^

It’s also a posable little tail, so you can swivel it around a bit so it suits whatever pose you need.


007

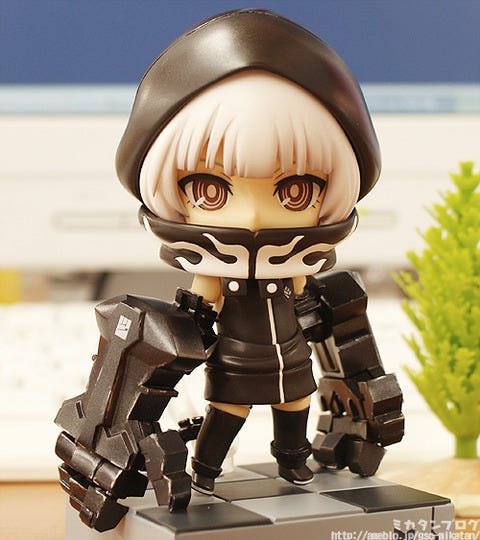
Her weapons are giant mechanical arms!

They are called ‘Ogre Arms’. They look super cute in Nendoroid form, and really make her noticeable.


005

Plus they are fully posable!!
 
There are joints on the elbows and all of the fingers! They really move around however you need them to!

       ___
     / ⌒  ⌒\
    /  (○)  (○) \   “You’ve outdone yourselves!
  /  ///(__人__)// \    …I can’t wait to try it!!”
  |       `Y⌒y’´    |
   \      ゛ー ′   /
    /      ー‐  ィ


002

Now let’s take a look at the optional parts!

Lifted shoulders and bent legs!

A separate set of shoulder parts lets you pose her with her arms more extended out. The Ogre Arm itself is also really posable so the combination of the two let you take all sorts of different poses.

The figure also makes use of the same stand as the previous BRS Nendoroids – a checkered base with a posable arm, which allows you to pose Strength is dynamic mid-air poses like the one above!
006

She also comes with normal arms!

As I mentioned above the Ogre Arm really makes her super noticeable… but without it she becomes super adorable!
 
It would probably also be interesting to attach just one of the Ogre Arms and let the other one stay as a normal arm. (Although I only thought of that after taking all the photos.. ;_;)


008

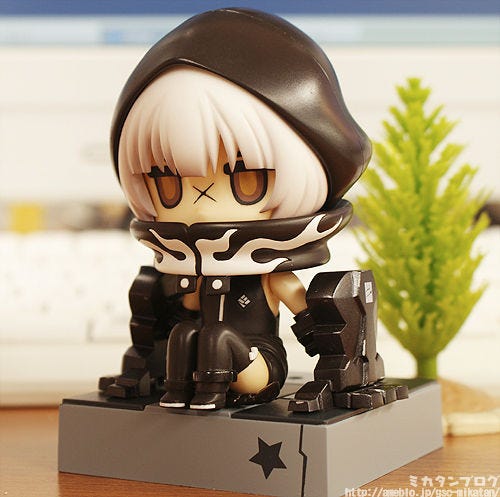
It wouldn’t be a BRS Nendoroid without…

The famous CHANxCO Face!
There are even extra parts to recreate the CHANxCO pose!

The new expression, new hair parts, new arms and even an extra lower body!

000

This is the original illustration!

The illustration was drawn by CHANxCO specially for the release of Nendoroid Black Gold Saw!

      ____
 / ) ) )/ \  /\
 {   ⊂) (●)  (●) \    ”Oooh!
 |   / ///(__人__)// \     Time to pose the CHANxCOs together!”
 !   !    `Y⌒y’´    |
 |   l      ゙ー ′   ,/
 |   ヽ   ー‐    ィ
 |           /  |

009

Noo!! Gold Saw-chan has been sent to China!

You’ll just have to enjoy a picture of these three instead… They’re so cute!!

003

The 4th BRS Nendoroid:
Nendoroid Strength!

         ____
       /      \
      /  ─    ─ \
    /    (●)  (●)  \
    |     (__人__)  |  ________
     \      |r┬-|   ,/ | |            |
    ノ      `ー’´  \  | |           |
  /´                 | |            |
 |    l                | |            |
 ヽ    -一ー_~、⌒)^),-、 | |_________|
  ヽ ____,ノγ⌒ヽ)ニニ- ̄   | |  |

She’ll be on the GSC site on the 31st!

For ordering details or questions please check out our partner shops.

All of our future products may be delayed due to shipping problems, planned blackouts and circumstances with the shipping companies, but we will strive to keep them all on the same schedule they are currently on. It’s hard to determine how things will turn out in the current circumstances, we hope everyone will understand!


That’s all for today!
I hope to see you all again tomorrow!  (・∀・)ノ゛


* Please note that this blog’s contents is originally written for a Japanese audience and is then translated for our foreign customers. All pre-order and release dates are the Japanese dates. Also note that not all products can be sold in certain areas

(C)huke / B★RS Project

DIY Figure Repairs Part 2: Reinforcing Joints

Hi again everyone!

The previous blog in this series featured a quick tutorial on fixing joints, but it doesn’t end there – today we’re going to be looking at reinforcing joints by making use of glue.

 You can find part 1 over here: DIY Figure Repairs Part 1: Broken Joints


– Reinforcing Joints –

027

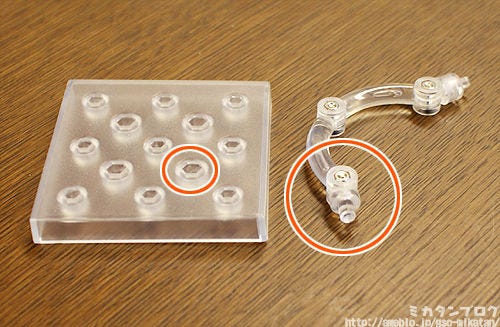
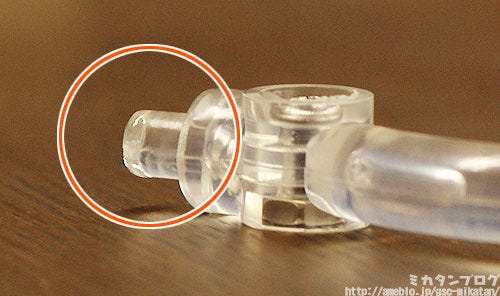
If you play around with your figures often, you’ll find that over time the joining area becomes looser.
Today’s tutorial will show you how to reinforce the joining area like the one circled on this stand, so that they connect firmly again!

026
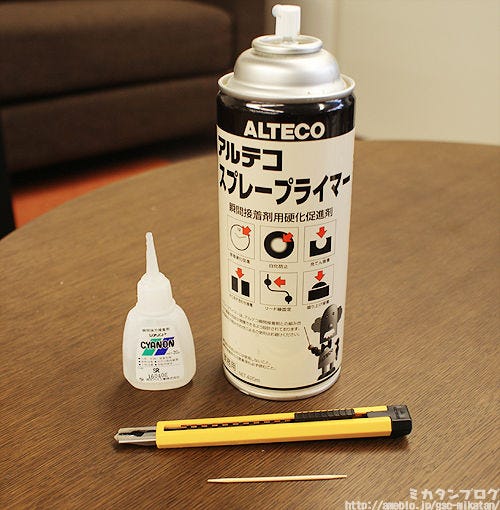
Today’s project will be using the following items!

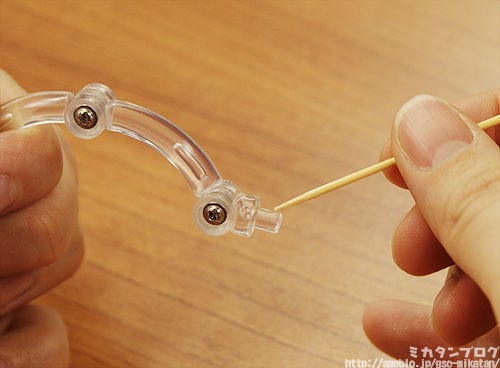
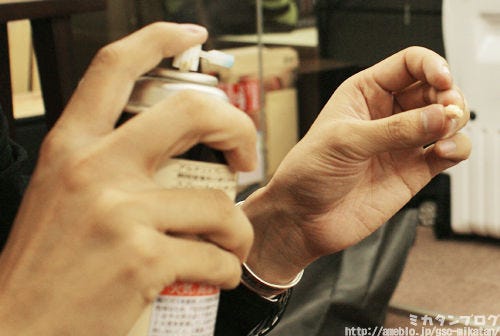
In the back we have some glue and some adhesive accelerator spray, and in front is a craft knife and a toothpick. In most cases the adhesive accelerator won’t be needed, but it will make things easier.

As long as you have glue, a craft knife and a toothpick, you’re set!

017

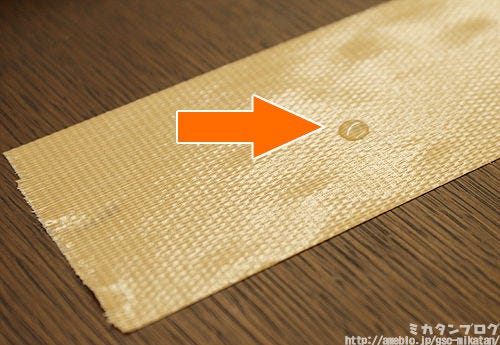
Place a drop of glue on a secure surface that won’t melt.
Just like last time, I’ve simply used some tape, but you can use whatever you can find. Just try to make sure you don’t get any glue on the desk or your hands.

018

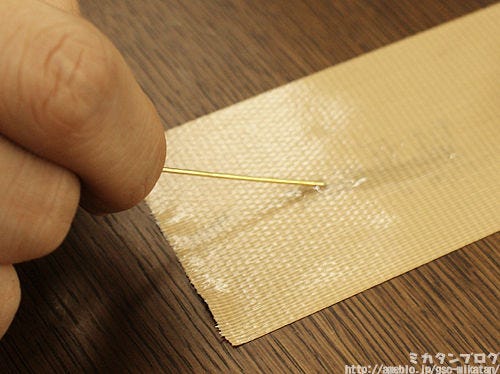
Take something long and thin and spread the glue out.
The image above is actually using a brass wire, but a toothpick will work just fine.

021
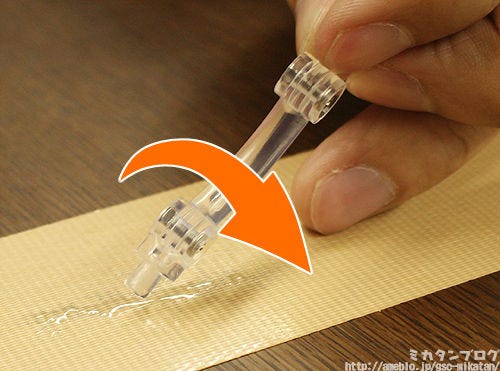
Place the joining area into the glue and spin it around.

Be careful though – you need to get glue only on the sides of the shaft and NOT on the base. It’s quite hard to explain in words, so let me give you a picture:

フィギュアメーカー・グッドスマイルカンパニー勤務 『ミカタンブログ -松戸駅から10マス進む-』
You want the glue to be on the pink area,
but NOT on the blue area!

If you get the glue on the base it’ll result in the shaft sticking out too far. Basically you’re just trying to make the diameter of the joining area ‘thicker’ with glue.

This series of blogs is actually being written with the help of Oda-P-sensei, but while doing watching him do this, I could only think to myself…

____
/      \
/  ─    ─ \     “Hmmm…
/   (=・=)  (=・=)\    If that was me…
|       (__人__)   |       I’d be getting glue on all the wrong places!”
\      ` ⌒´   /
ノ            \

If you’re worried like me, then you can do the more secure method below:

022

‘Paint’ the glue on by using the tip of a toothpick!
You still need to be careful not to get the glue on the base or too high up.

This method should also be used for smaller parts.
It’s considerably easier to apply the glue using this method instead of just applying it to the joint directly. (Although it’s also slower.)

022

Complete!

You can see the area around the bottom is slightly thicker now.


023

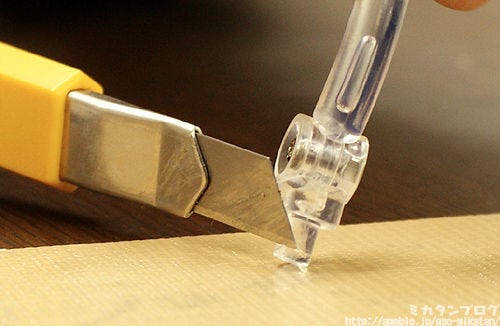
If you put too much glue on, you simply need to shave some off with the craft knife.
Just make sure the glue has dried completely before doing so. Whilst it does depend on the type of glue, normally the craft knife will easily slice through the glue, so be careful not to cut yourself in the process.

024

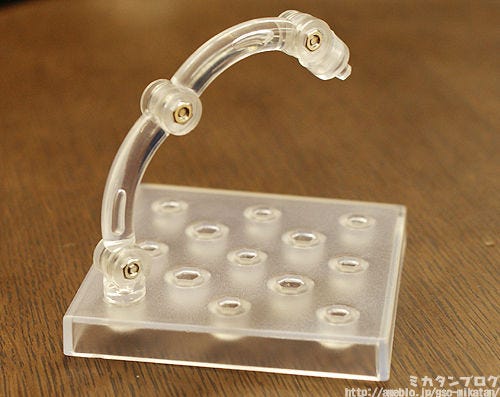
Finished!

By making the shaft slightly thicker it fits into place just like new!

I made use of a stand in this example, but you can use the same method for any kind of connecting joint. As always, just be careful not to get glue on the figure itself.

Next time we’ll be looking at dealing with scuffed paint! (・∀・)ノ

It’s a little more complex then the previous two… but even so, it’ll be up on the blog if you want to give it a try!

That’s all for today!
I hope to see you all again tomorrow! (・∀・)ノ゛

Tomorrow’s blog will be a figure review!


DIY Figure Repairs Part 1: Broken Joints

Hi everyone!

I’ve received a multitude of messages from people showing the destruction caused to their figures, as well as a couple of people asking if there are any good ways to repair them, so today I’m going to start a new series of blogs discussing the repair of your figures in the case they break! If you’re a figure lover then it’s sure to helpful to you at some stage.

-Broken Joints-

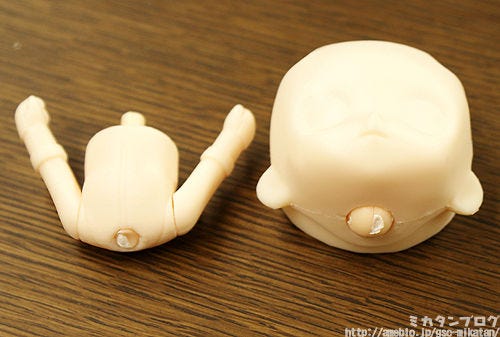
001

When Nendoroid joints break, it’ll often be like this…

First you need to remove the two broken pieces. Follow the instructions below.


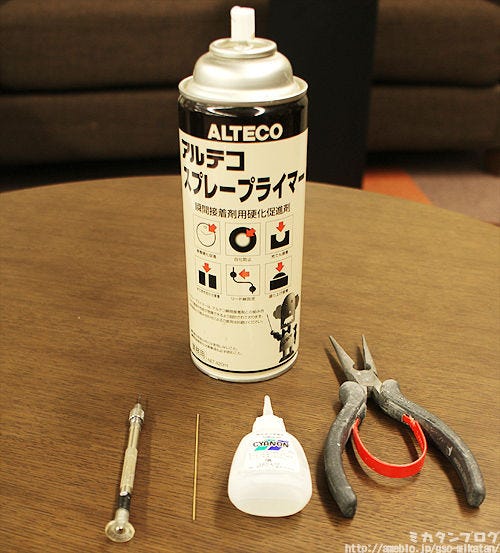
002

These are the items you will need.

The large can is a can of adhesive acceleration spray. The bottom items from the left are: a 1mm pin vice, a 1mm brass wire, glue and a pair of pliers. There might be some items you’ve never used before, but…

at the very least you will need the pin vice, the glue and something similar to the wire.

You can find a pin vice in almost any 100 yen shop, they are not that hard to find.


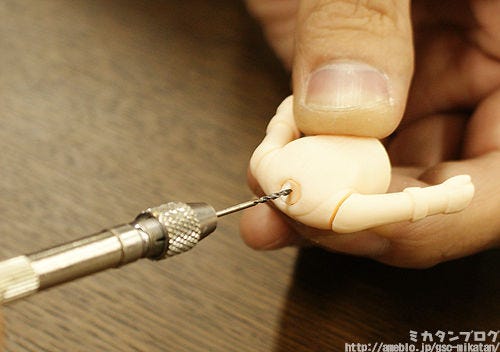
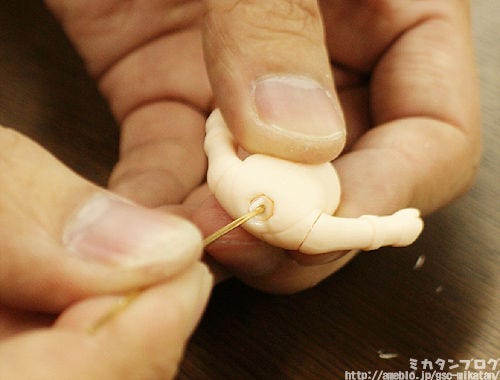
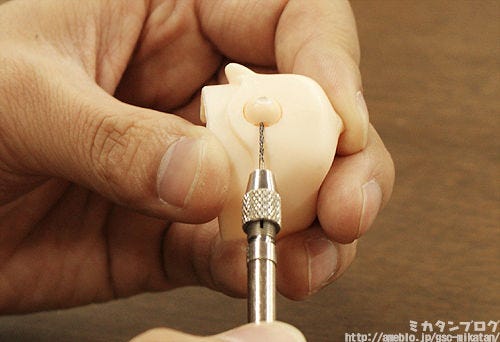
003

Start by removing the bottom part of the broken joint.

Use the pin vice to create a hole in the very center of the joint. Be careful not to hurt yourself!


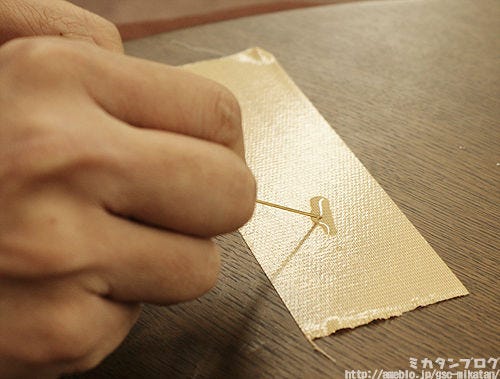
004

Place some glue out on something and dip the wire in it.

I’ve just put some glue on some tape, but you can use whatever you have around so long as it doesn’t melt from the glue.  Try not to get any of the glue on your hands!


005

Push the wire into the hole you made.

Try not to put too much glue on the wire otherwise it might leak out onto the figure itself. Watch as you push it in to make sure the glue does not overflow.


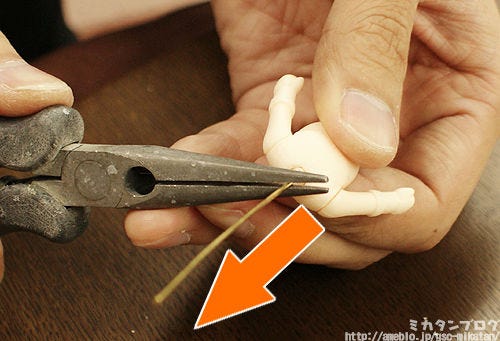
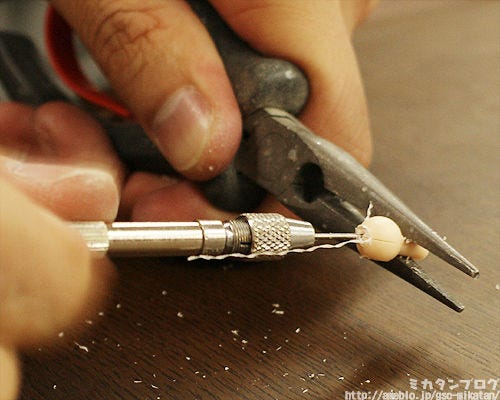
006

Once the glue has hardened, simply pull on the wire to remove the joint.

I’m using pliers in the image, but you can use your bare hands as well. Just be careful not to hurt yourself!

Now you’ve removed the bottom half of the joint from the figure!


007

Now we move onto the top part of the joint.

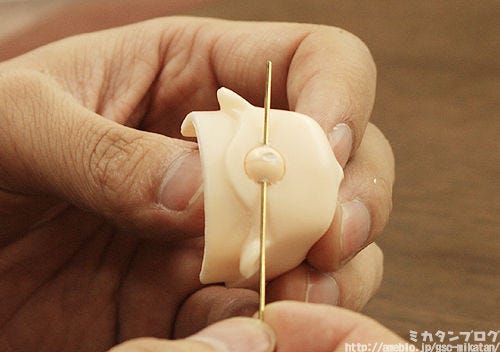
This joint has a circular bit, and you need to pierce a hole in the joint horizontally using the pin vice. Go straight through the joint, but be careful not to damage the actual figure.


008

Place the wire straight through the hole you made.

Now you simply just need to pull the brass wire up using to the two ends that are sticking out… and the joint will come out with it!


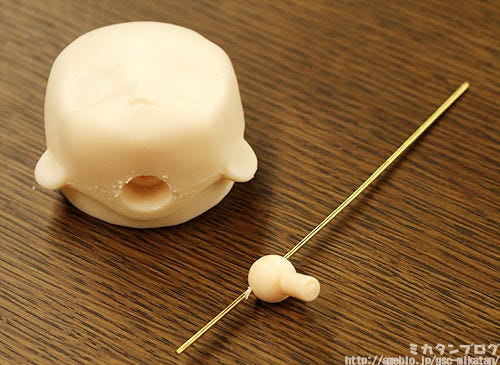
009

Broken joint removed!

In a case like this where it’s the neck joint that’s broken, you can simply replace the joint with one from another expression. Most characters all use the same colored joints, so you can even use one from another character quite easily.

But, there are cases where another joint that isn’t replaceable breaks!

For example, if a joint on a characters twin tailed hair breaks… you can’t easily replace it as the colors will mismatch if you use a joint from another figure.

In these cases you can repair the joint into a non-posable joint:


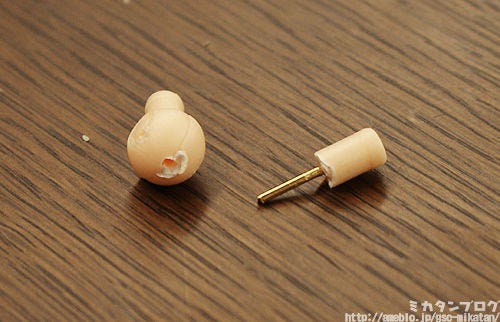
010

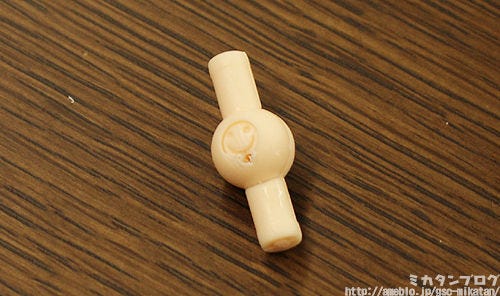
These are the two pieces that were just removed.

You do not need to remove the wire from the bottom part of the joint, (left in this picture) you will need it in the repair process.


011

Create a hole through the upper joint using the pin vice.

Be careful! This hole will establish what angle the joint will be at!

If you want the joint to be completely straight, then create the hole straight through the middle. If you want the joint to be at an angle you need to place the hole to the left or right, depending on how you wish to angle it. For this example I’m simply making a straight joint – so I’ll be making the hole straight down the middle.

Joints are also very small and hard to work with using just your hands, so I recommend holding them still using pliers or something of the like. If you just just your bare hands you are more likely to injure yourself, so please be careful!


012

Cut the brass wire so that it will fit into the hole you just made…


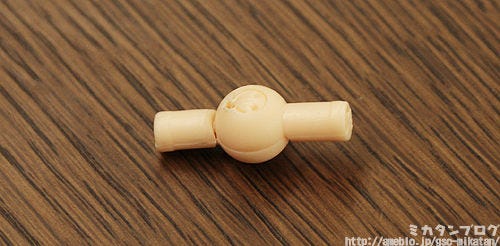
013

And connect them together once again!


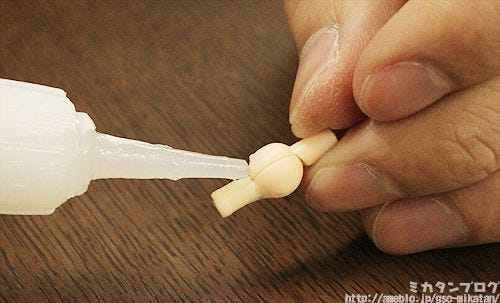
014

Place some glue around the area where the break was to secure it and prevent it from falling out.

Don’t get any glue on the desk or your hands!

015
Then finish off with some adhesive acceleration spray.

This is an optional step – if you don’t have any then don’t worry about it. Just wait for the glue to dry well instead.

016

Success!

Seen you have a brass wire through the middle, it is also a very durable repair job. This will obviously prevent it from being posable, but it is a reliable repair method if there is no way to replace the joint with another one.

Next time will be a blog focusing on reinforcing joints using glue!  (・∀・)ノ


– Notice –

I introduced her on my blog yesterday, but she is now up on the Good Smile website – don’t miss out on Nendoroid Miku: Support ver.!

018

Each sale will contribute 1000 yen to the Japan Red Cross to support relief efforts in Eastern Japan. We will also be shipping her overseas, you can order from anywhere!

Overseas orders will be taken at the GSC Online Shop from the 8th April.

The figures will be made-to-order, so be sure to order if you wish to show your support. Further details about payment methods and shipping will be put up on the Good Smile Online shop in the near future.

Good Smile Online Shop:http://goodsmile.ecq.sc/

If you are ordering from overseas, please note the following:

Overseas Sales■ Orders start on the 8th April. More details will be revealed later.
■ Delivery will be in late July, and may incur an additional fee. 

That’s all for today!
I hope to see you all again next week! (・∀・)ノ゛

(C)Crypton Future Media, Inc. ALL RIGHTS RESERVED

Nendoroid Miku Hatsune: Support ver. is Here to Cheer on the Recovery of Eastern Japan!

After the huge earthquake that hit Eastern Japan earlier this month lots of people are living in very unfortunate circumstances in the East of Japan. Good Smile is trying to help in any way it possibly can.

All sales of Nendoroid Miku Hatsune: Support Ver. will support the relief efforts in Eastern Japan.
Each sale will contribute 1000 yen to the Japan Red Cross. Overseas sales will be available!

Today I’ll be doing a review for Support Miku!  (`・ω・´)ゞ

011

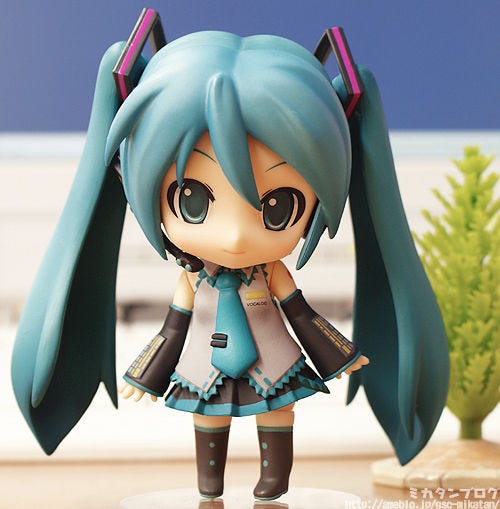
Nendoroid Miku Hatsune: Support ver.!

First up is her normal face and standard pose!

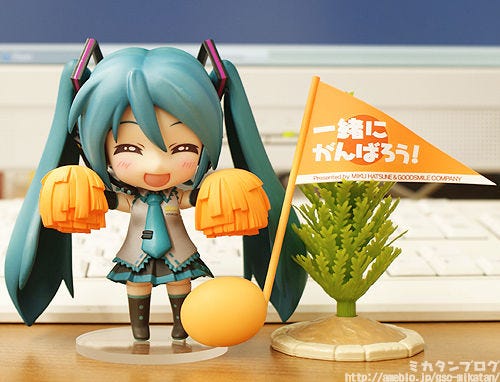
This version of Miku is based on the normal Nendoroid Miku and comes with all the extra parts and expressions from the original. but also includes new parts such as a support face, a support flag and some pompons to cheer on the recovery of Eastern Japan!


012

Her singing face, bent left arm and twisted leg parts!

The perfect set of parts to recreate Miku in her singing pose. I’m using the twisted leg on her right, but you can also use her left leg instead.

013

Her Hachune face, Hachune hair and the famous leek!

The complete Hachune set is of course also included! You can pose her in the classic ‘leek swinging’ pose!

↑  Up to here has been the normal Nendoroid Miku!

The Support ver. contains everything you see above, plus…!

014
First up she comes with a brand new facial expression…

A bright, smiling face to cheer everyone up!

With this expression included that means the figure come with a total of four expressions!!
015

A support flag shaped like a musical note!

This is a collaboration between Miku and Good Smile, so the musical note is GSC’s orange! The flag reads ‘You are not alone!”, I hope Miku’s message reaches everyone it needs to!

016
You can also remove the bottom for a normal flag!

The reverse side of the flag is left blank so you can put whatever stickers you want on it. The one in this version features a GSC logo, but the figure comes with a couple of other stickers as well.

You can even write your own support message and fly a completely original support flag!

Once everyone has their Miku I’ll be have a photo contest to see what kind of support flags everyone manged to come up with! Also be sure to put it up on your blog to show your support!

017
She also comes with pompons to cheer everyone on!

These are actually attached by removing her hands entirely and attaching the pompons as hands. They are also an inspiring orange in color!

018
Nendoroid Miku Hatsune: Support ver.!

The normal Miku with a whole bunch of extras to show support to those in need!

019

Orders will be taken at the GSC Online Shop from the 8th April.

The figures will be made-to-order, so be sure to order if you wish to show your support. Further details about payment methods and shipping will be put up on the Good Smile Online shop in the near future.

Good Smile Online Shop:

http://goodsmile.ecq.sc/

If you are ordering from overseas, please note the following:

Overseas Sales

■ Orders start on the 8th April. More details will be revealed later.
■ Delivery will be in mid-July.

And finally,

A big thank you to Crypton for their support with this figure. Let’s hope that everyone in the East will be able to see loads of smiles again soon!

That’s all for today!
I hope to see you all again tomorrow!

(C)Crypton Future Media, Inc. ALL RIGHTS RESERVED

1/8th Scale Nadeko Sengoku (Part 2)

Today I’ll be continuing my review of the cute Nadeko!

002

The second figure in the Bakemonogatori series:

1/8th Scale Nadeko Sengoku!
 
As I mentioned yesterday, the pose above is based on the jacket cover of the 4th volume Blu-ray & DVD box for series. Here is part one if you missed it: 1/8th Scale Nadeko Sengoku (Part 1)

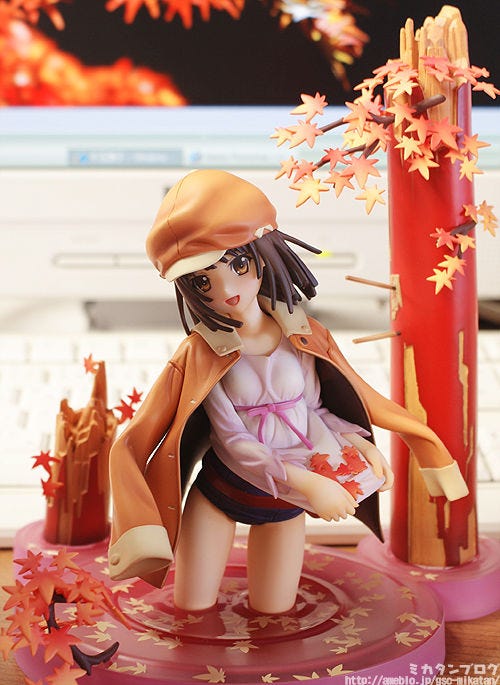
It features Nadeko with her feet wading through water, some old Japanese torii archways, beautiful autumn leaves… it’s a figure filled with beauty!

But she actually comes with another secret!


01

She comes with optional leg parts!

          ____
        / ノ ‘ ヽ \
 ミ ミ ミ /  (≡)  (≡) \      ミ ミ ミ
/⌒)⌒)⌒.///(__人__)//\   /⌒)⌒)⌒)
| / / /     |::::::|     | (⌒)/ / / //
| :::::(⌒)   l;;;;;;l     /  ゝ  ::::/
|     ノ     `ー’     \  /  )  /
ヽ    /             ヽ/    /
 |    |   l||l 从人 l||l      l||l 从人 l||l
 ヽ    -一””””~~``’ー–、   -一”””’ー-、
  ヽ ____(⌒)(⌒)⌒) )  (⌒_(⌒)⌒)⌒))

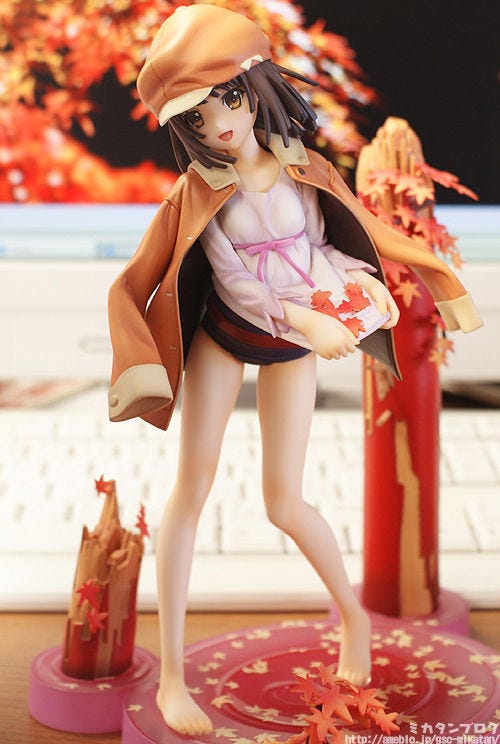
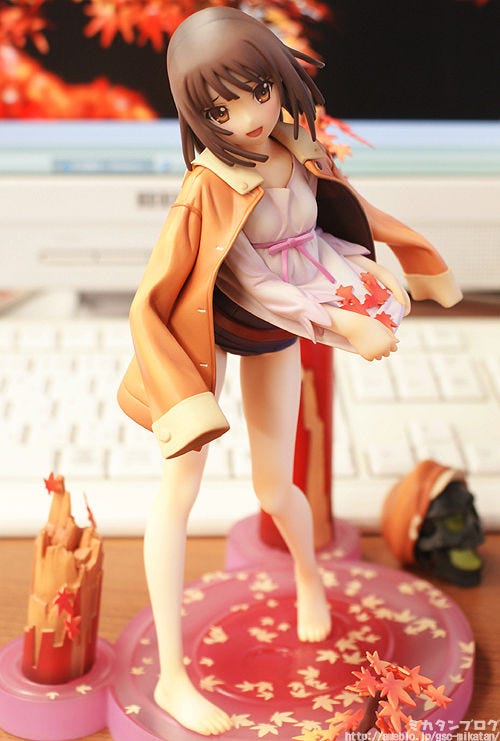
For all those who would prefer to display Nadeko’s entire body, these are the extra parts included for you! Plus the fact that she is bare foot also adds to the charms of her school swimsuit!

002

We also can’t forget her adorable hat!

Yesterday’s bust-up shot from didn’t include the hat, so today has to include it!  Removing and putting the hat on is simple, so you can easily switch whenever you want!


003

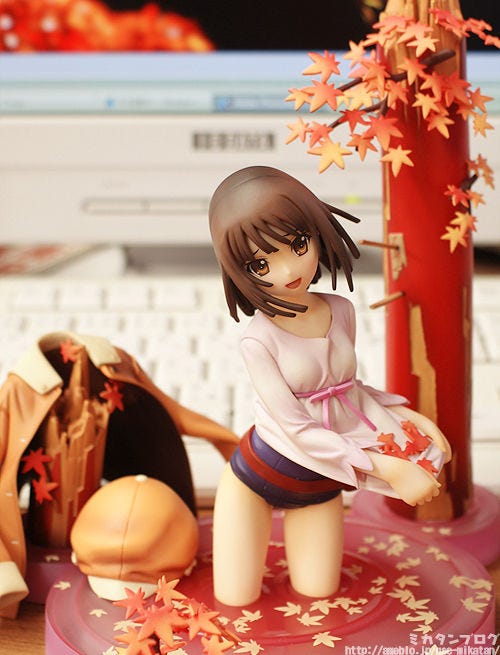
Full body shot with no hat!

This version of Nadeko really has a strange kind of erotic feeling to it…. ^^;

Personally I think it’s because…

– She might be wearing a shirt over it, but underneath you know there is a school swimsuit there!
 
– The embarrassed expression on her face while holding her shirt out!

Those are the two reasons for the erotic feeling… in my opinion at least…

008

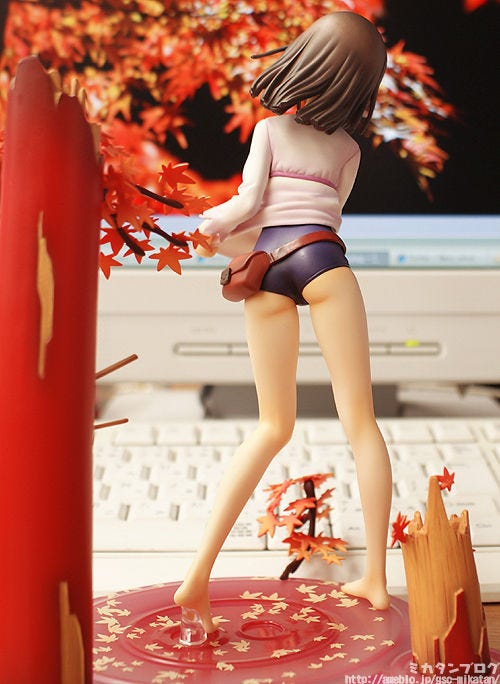
This is how she looks from the back!

When you use the leg parts with the feet Nadeko suddenly seems to have much more of a presence!  Her left foot has a little transparent piece to connect her to the stand, but the right foot can be spun and placed in any direction.

010

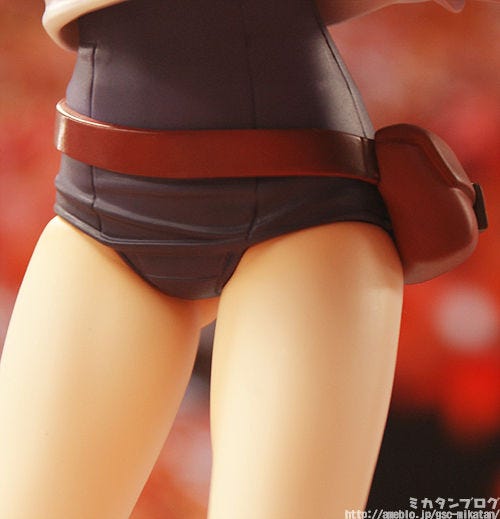
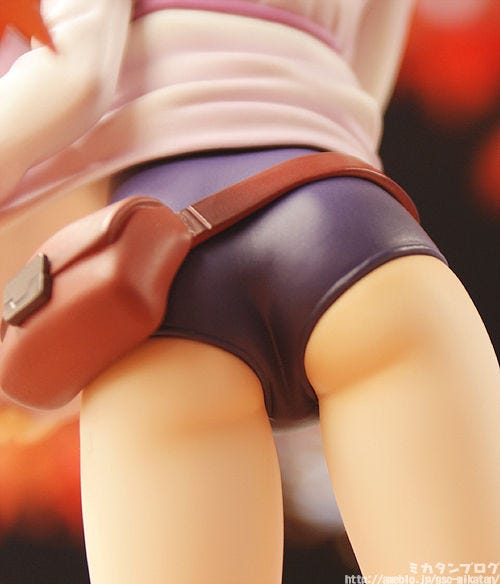
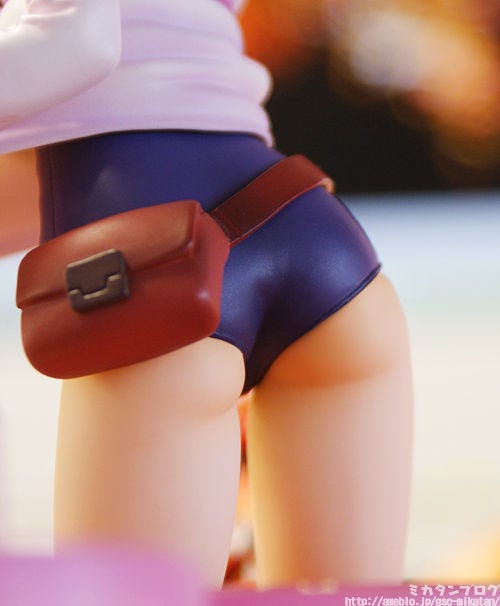
She has a little slack bag on her hip!

Also, I couldn’t really get a good picture of it, but…

The gap created where her thighs and the swimsuit meet is stunning!

If you buy her be sure to take a look, it’s a wonderful sight!!

009

Service Shot #2!

          ____
        /      \
       / ─    ─  \
     /   (≡)  (≡)   \    “Nadeko! You’re too cute!”
     |    (__人__)    |
      \   `Y⌒y’    /ヽ
      (ヽ、  ゛ー ′  / ̄) |
       | ``ー――‐”|  ヽ、|
       ゝ ノ      ヽ  ノ |
  ̄ ̄ ̄ ̄ ̄ ̄ ̄ ̄ ̄ ̄ ̄ ̄ ̄ ̄ ̄ ̄

Hmm… I’m starting to think that people involved with Bakemonogatari are going to get annoyed with me if I continue with all of these shots… sorry! I really do love Bakemonogatari! I’ve bought every single one of the DVDs!

013
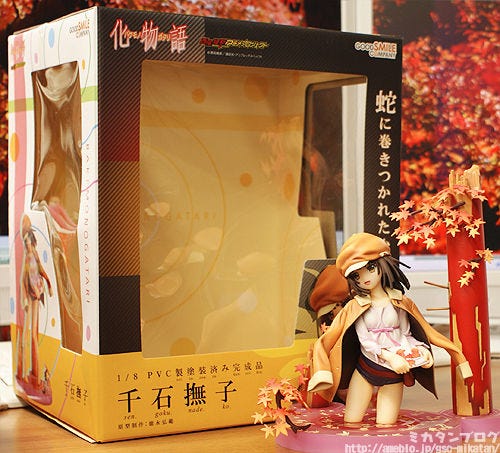
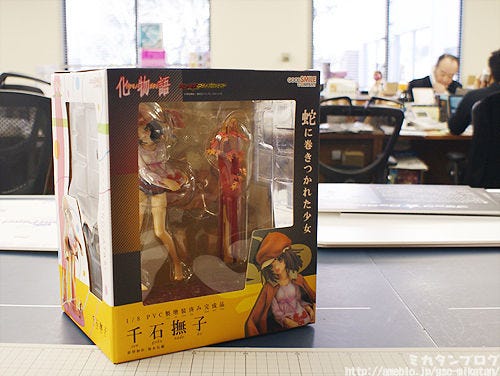
This is how the box looks!

The yellow and brown give a kind of mature feeling to the box, and suit the autumn feeling of the figure.

The 2nd figure in the Bakemonogatari series:

1/8 Scale Nadeko Sengoku!

   / ̄ ̄\
 /   ⌒ ⌒\ 
 |    ( ●)(●)                ___
. |   ⌒(_人_)            /      \    ”Nadeko, Please!”
  |     |r┬-|           /─    ─    \ 
. |     `ー’} \       / (●) (●)      \
.  ヽ        }    \    |   (__人__)      | 
   ヽ     ノ       \   \   ` ⌒´     _/
   /    く. \      \  ノ           \
  |     \  \    (⌒二               |
    |    |ヽ、二⌒)、      \         |  |

She was sent out from GSC today!

Deliveries to certain areas cannot be made due to the recent earthquake, but as soon as possible products will be sent out.

For ordering details or questions please check out our partner shops.

All of our future products may be delayed due to shipping problems, planned blackouts and circumstances with the shipping companies, but we will strive to keep them all on the same schedule they are currently on. It’s hard to determine how things will turn out in the current circumstances, we hope everyone will understand!

That’s all for today!
I hope to see you all again tomorrow! (・∀・)ノ゛


(C)西尾維新/講談社・アニプレックス・シャフト


* Please note that this blog’s contents is originally written for a Japanese audience and is then translated for our foreign customers. All pre-order and release dates are the Japanese dates. Also note that not all products can be sold in certain areas


1/8th Scale Nadeko Sengoku (Part 1)

The GSC Office is finally getting back into the swing of things…


001

Which means I’ll start getting product samples again!!
We are of course trying to send all new products out to as many regions as possible, but under the circumstances there may be some areas that will have delayed delivery – if it’s not there on the release day just be patient…. it will reach you eventually!

         ____
       /      \
      /  ─    ─ \     ”The office looks a little dark…?”
    /    (●)  (●)  \
    |       (__人__) | ________
     \      ` ⌒´   ,/ | |          |
    ノ           \ | |           |

The GSC Offices are currently out for the planned black-outs!

My desk is about half in the dark, but that’s not going to stop me from taking photos… the lighting might be a little different to normal, but the figure is super cute so I don’t think it’ll make too much of a difference… I’ll take some extra pictures instead!

That said, let’s get onto today’s product!

002

The 2nd figure in the Bakemonogatari series:

1/8th Scale Nadeko Sengoku!
 
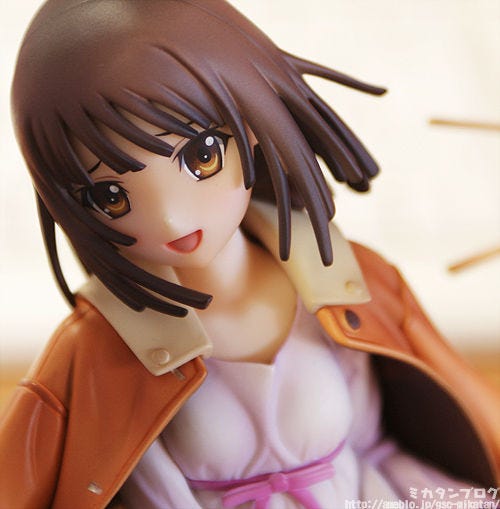
Nadeko is from the popular anime series ‘Bakemonogatari’! The pose of the figure is based on the jacket cover of the 4th volume Blu-Ray and DVD covers of the series. It shows Nadeko wading through some water with an adorable smile beaming across her face in a relaxed autumn atmosphere.

She is the second in a series of figures, following on from Hitagi Senjougahara, and just like her predecessor… she is filled with extra parts and a stunning base to boot!!  Σ(・∀・)


003

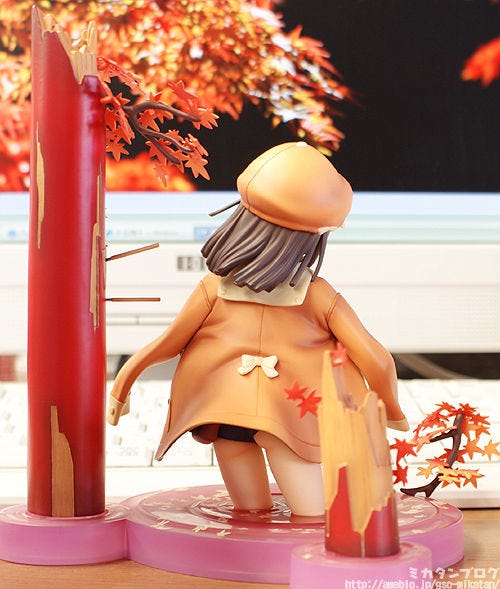
This is how she looks from the back!
 
It doesn’t matter what angle you look at her from… she looks great from any angle! It’s wonderful to see more figures that build an entire scene like this one!


015

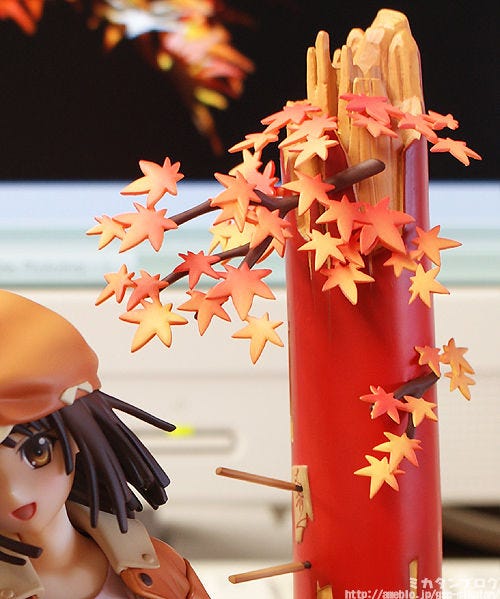
An old torii archway and autumn leaves!

       ____
    /::::::─三三─\
  /:::::::: ( ○)三(○)\   “Ooh!
  |::::::::::: (__人__):::|    The gradient color on the leaves is stunning!”
   \:::::::::  |r┬-|   /
   ノ:::::::::  `ー’´   \

     / ̄ ̄\
   / .ー  ー \   ← Gakkun from the Production Team
   | (○) (○) |  
   |  (_人_) |     ”I’m glad you like them…
   |   `i  i´ |       We redid them so many times to get them right…”
   |   . `⌒   }      
   ヽ       } 
    ヽ     ノ 
   /      ヽ 

Just like Hitagi, the stand is just as amazing as the figure itself!

If you haven’t seen it before, take a look at this article to see just how the painting is done:
Paiting 1/8th Scale Hitagi Senjougahara’s Stationary!

005

Her jacket and hat can both be removed!
 
Nadeko is easily embarrassed so she tries to hide behind her jacket and hat… which looks fine on her, but…

But she looks even cuter without them!! (;゚∀゚)=3

Just like Hitagi’s skirt, even the inside of Nadeko’s jacket has been completely painted!

The area where the the jacket connects to her however is kept the same color to make sure that the different color does not rub off onto the actual figure.
004

A cute bashful smile…!
 
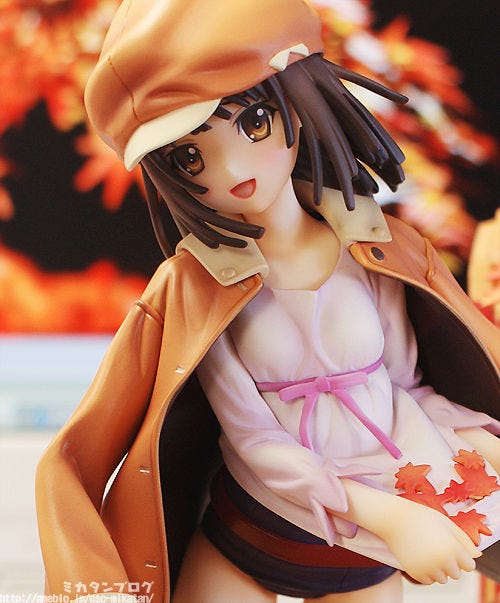
Aww, she is trying so hard to hide her embarrassment, but she just can’t hide those frowning eyebrows!!


011

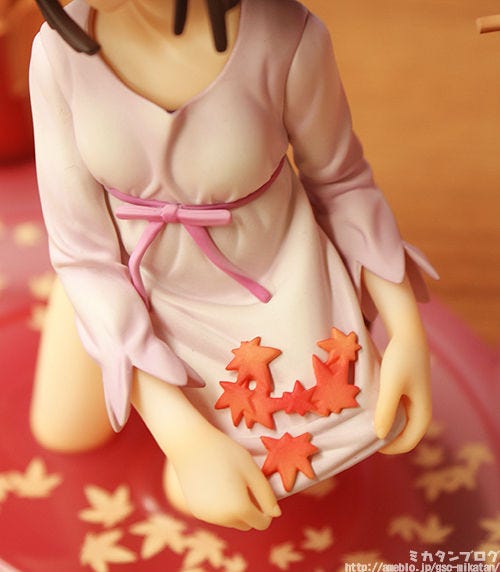
Autumn leaves on her shirt!
 
Plus look at the detail of the creases around her breasts! They are perfect! Obviously the leaves on her shirt have the same stunning paint work as the other leaves.

012

There is a snake inside the clear base!
 
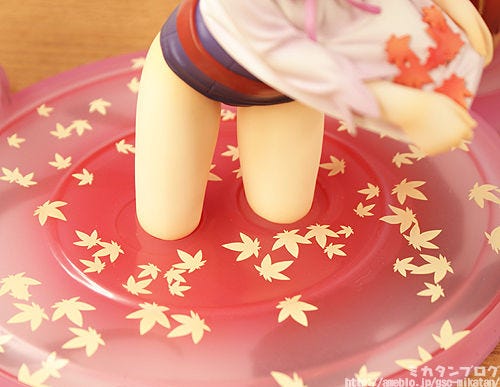
It looks like he is just at the surface of the water, twirling around Nadeko’s legs….! I can’t believe the amount of thought that must have been put into this figure!

The base is made of clear plastic, but if you look close you’ll notice it also has a lovely gradient effect to it. There are also bright gold leaves floating all over the water, and stunning ripples moving out from Nadeko’s legs. It all comes together to create a really stunning scene!

018

Service Shot!

゚ | ・  | .+o   ____* o。 |。|   *。 |
゚ |i    | +   /_ノ ‘ ヽ_\   | |!    |
o。!    |! ゚o / (≡)   (≡) \   | * ゚ |
  。*゚  l ・/::⌒(__人__)⌒::\ |o  ゚。・    
 *o゚ |! |      |r┬-|     |  + *|
| ・    o \       `ー’´     / *゚・ +||    
 |o   |・゚  >        |  *。*   |    
* ゚  l|  /           |    | +|

That’s all for today’s blog… but…

Nadeko also comes with a set of replaceable legs!
Tomorrow I’ll take a look at her with the alternate legs instead.

That’s all for today!
I hope to see you all again tomorrow!

(C)西尾維新/講談社・アニプレックス・シャフト

* Please note that this blog’s contents is originally written for a Japanese audience and is then translated for our foreign customers. All pre-order and release dates are the Japanese dates. Also note that not all products can be sold in certain areas

Mikatan’s Factory Field Trip! – Part 4

The 4th report of my trip to the GSC factory in China!

My previous reports havecovered both the molding and painting of figures!
 

        ____
      /     \ 
     /   ⌒  ⌒ \   “I don’t remember that at all…. when was this…?”
   /   ( ―)  (―) \  
   |   、” ゙)(__人__)” .)|    ___________
   \      。` ||||==(⌒)ー、| |             |
__/         ||||    \  〉| |             |
| | /    ,  | ̄ ̄ ̄ ̄ ̄| ̄ ̄ .| |             |
| | /   /   ヽ回回回回レ    | |             |
| | | ⌒ ーnnn.ヽ___/     |_|___________|
 ̄ \__、(“二) └─┘ ̄l二二l二二  _|_|__|_

Yes, well… it was quite awhile ago, wasn’t it….
Here are the links to the previous articles!


Mikatan’s Factory Field Trip! – Part 1
Mikatan’s Factory Field Trip! – Part 2
Mikatan’s Factory Field Trip! – Part 3
1/8th Scale Hitagi Senjougahara (Part 3) – (Stationary Painting)
1/8th Scale Hitagi Senjougahara (Part 4) – (Stationary Painting #2)


If you’ve already read them and just want a quick recap, then here we go…

▼ The two types of molds!

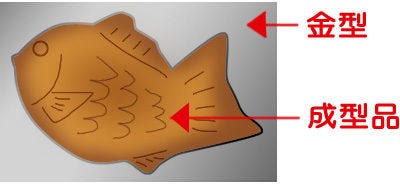
001

▼ Mask Painting!

002

▼ Painted Product

003

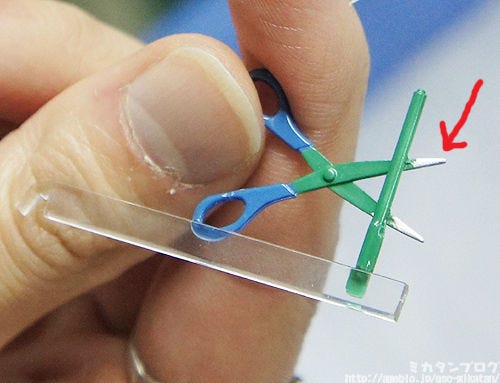
That about covers it all in a nutshell, so let’s move onto today’s topic!

004

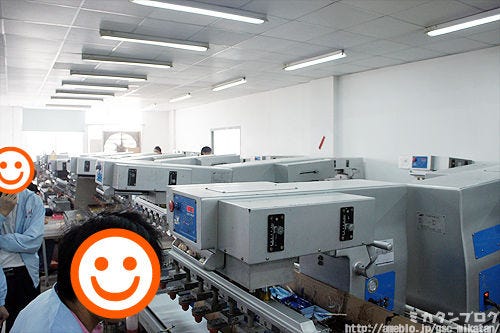
Stamp Printing!

Creating things like eyes and other patterns on figures would obviously take too long by hand, so these stamping machines are used!


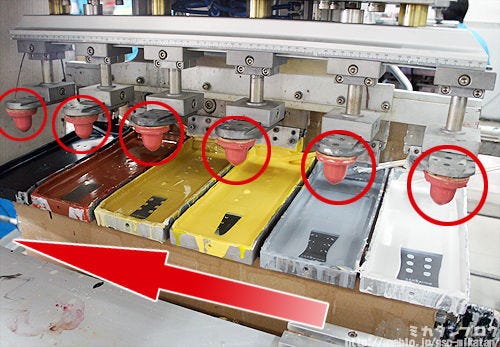
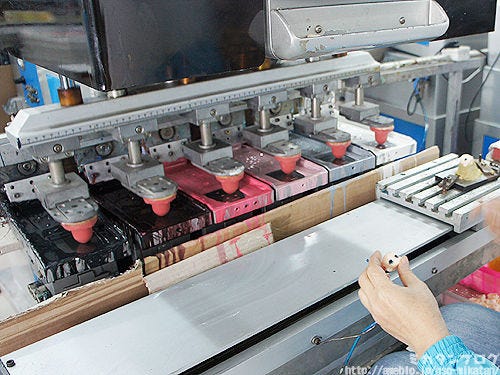
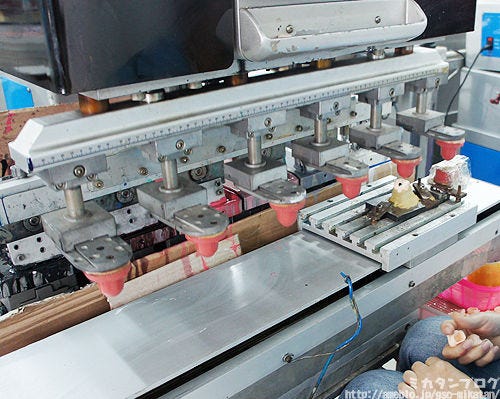
005

First a different color is set in each part!

The product needing the stamping will start on the right and move through to the left…

It normally goes from the lightest color to the darkest!

If you went from dark to light, then the lighter colors would not come out as clearly. There are some figures where the color process varies, however.

006

This is basically the order an eye would be stamped!

If you’ve used layers in Illustrator or Photoshop I’m sure you can get a good feeling for how the colors layer on top of one and other. It’s the same concept!


014

The parts to be stamped are placed on a stand!

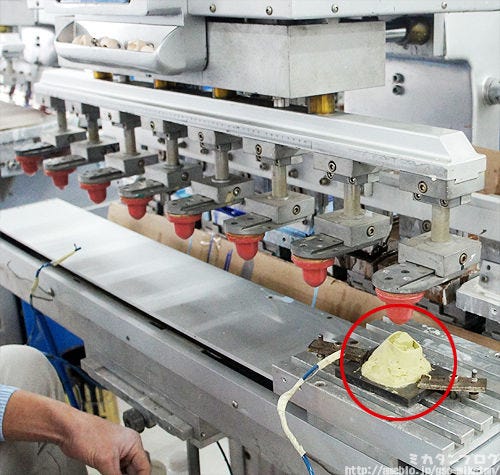
I know it kind of just looks like a lump of putty from the photo, but it’s actually a lot more important than that! The stand has to be made to make sure that every single figure ends up identical – imagine if the eye on one of your Nendoroids was even 1mm off from where it should be! The stand is created to make sure that every position and angle stays the same on each figure.

012

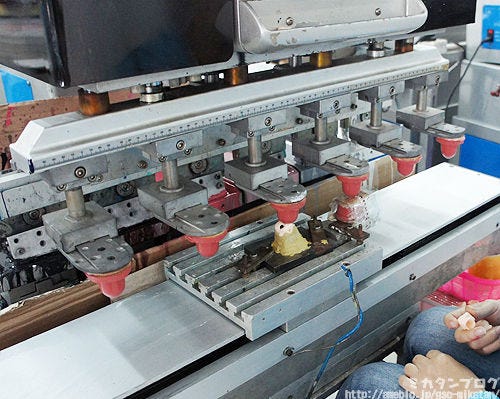
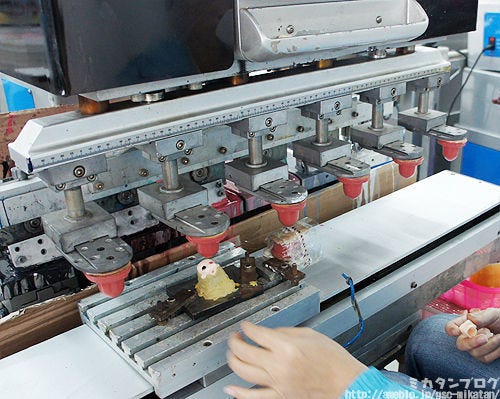
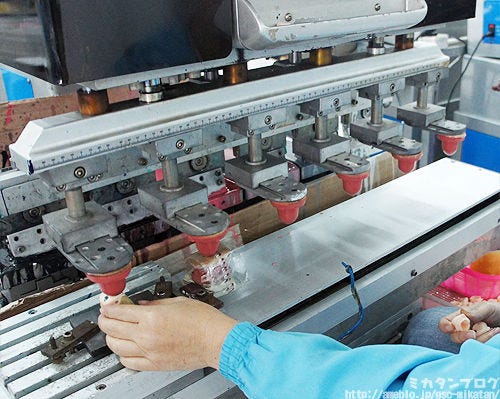
Okay, let’s take a closer look at the actual process!

The next set of photos show the process of stamping the left eye above.

016

(1) First the paint is placed on the stamp…

007

(2&3) The white and gray are applied…

I missed taking a photo of the white part! The machine is really fast! …orz

008

(4) The light pink is stamped….

009

(5) The darker pink is stamped…

010

(6) The brown is stamped…


011

(7) The black is stamped…

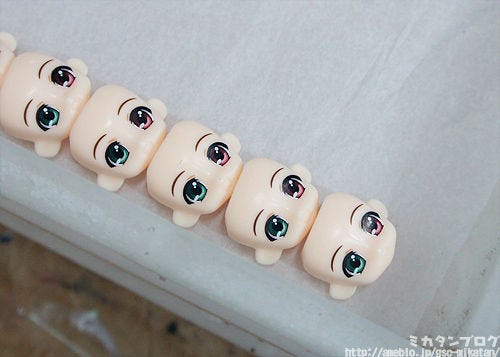
015

(8) Complete!!
        ____
       /      \   
      /  ─    ─\ ”Huh? The white of the pupil is missing…? “
    /    (●)  (●) \   
    |       (__人__)    | ___________
    \      ` ⌒´   ,/ | |             |
___/           \ | |             |
| | /    ,                | |             |
| | /   ./             | |             |
| | | ⌒ ーnnn          |_|___________|
 ̄ \__、(“二) ̄ ̄ ̄ ̄ ̄ ̄     _|_|__|_

013
Correct! The white is stamped using a different machine!

Well, the same type of machine, but just in a different production line after the one above. The reason for this is quite simple…

The white needs to be stamped on twice seen it is being placed on darker colors!

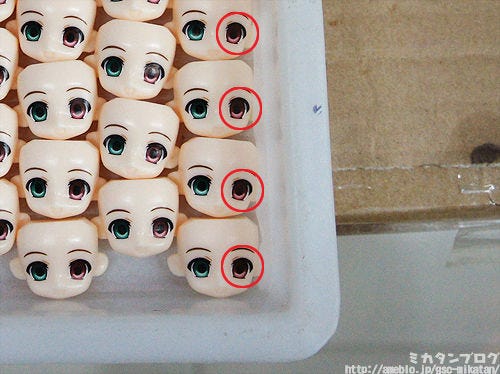
The white bit on Nendo Petite eyes have a diameter of just 1mm, but even so the machine manages to stamp them on twice at the perfect location every time!!

It’s just like getting your name on a grain of rice… that’s how fine the work needs to be.

By the way…

http://vision.ameba.jp/watch.do?movie=3547155

It’s probably a lot easier to see what is going on from the video, so if you’re interested do take a look.

That’s all for today!
I hope to see you all again next week!  (・∀・)ノ゛

Miku Hatsune: Tony ver.

Hi everyone. I’m finally getting back to blogging normally!
 
I hope my posts can bring a little smile to all those who need it in these times of trouble!


002

So today I’m going to be taking a look at…

Max Factory’s

Miku Hatsune: Tony ver.!

A new figure of Miku based on the famous illustration by Tony! Even the transparent feeling from Tony’s original illustration has been transferred to the 3D rendition!

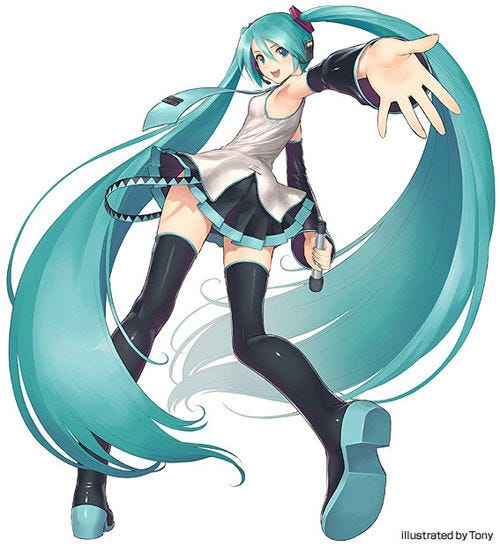
Let’s take a look at this image first! (・∀・)ノ


000

This is the original illustration!
 
When you compare it to the figure you’ll notice just how similar they really are!

The figure is sculpted by Chieri! Sculpting the figure so close to the original illustration must have been quite the task! As expected of Chieri!!


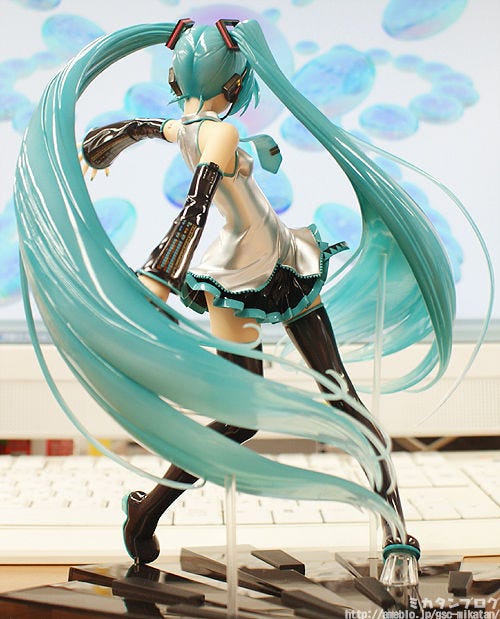
003

This is how she looks from the back!

The hair swirling all around her really gives a nice dynamic feeling to the figure. The light colors that Tony uses in his illustrations are also very apparent in the figure version!


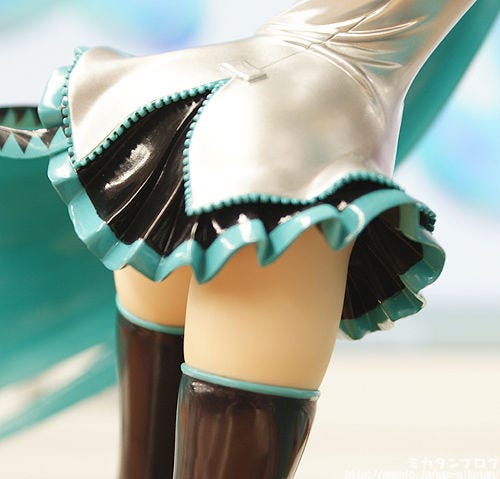
005

Miku always has nice thighs showing!

It really gives a sexy feeling to the figure… it also really makes it feel like a figure sculpted by Chieri…!
 
The bodyline from her waist down to her bottom is also fantastic!

004

A cute smile!

It really is a perfect conversion of Tony’s Miku! She’s so cute!!

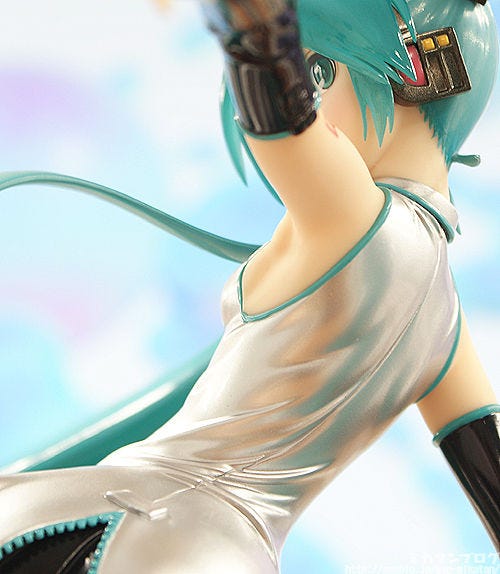
007

The silver painting on her top is stunning!

Oooh… I never thought the parts that looked so good on the master figure would come out just as nice on the final product!! Oh, and I didn’t pick this angle for any specific reason by the way… 😉


008

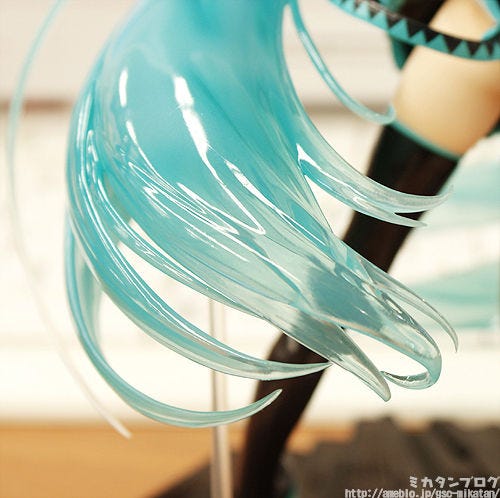
Her hair features beautiful clear plastic!

As you move toward the tip of the the hair it becomes more transparent. You can see here just how detailed it is as well!


009

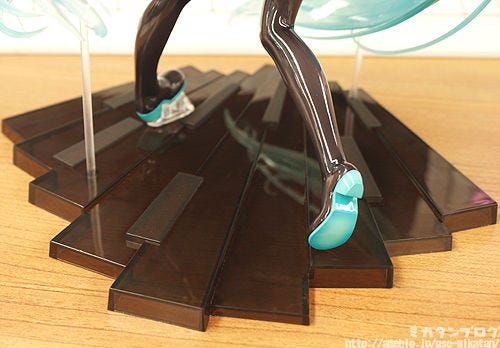
This is how the base looks!
 
It looks like something out of the near future… very appropriate for a virtual idol!

You can also see that the twintails each have a transparent rod to support them. The figure comes with a little explanation sheet which will explain where all the pieces fit into.

010

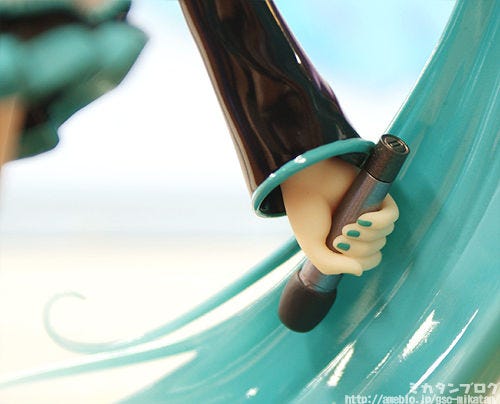
She has a mike in her right hand!

The mike can be removed and replaced whenever you want. She even has a manicure done on her fingernails… it looks so neat!

006

Service Shot!!

     ____
   /      \
 /  ─    ─  \     ”I could take pictures like this forever…!”
/   (≡)  (≡)  \
|    (__人__)    |
\   `Y⌒y’    /ヽ
(ヽ、  ゛ー ′  / ̄)|
| ``ー――‐”|  ヽ、.|
ゝ ノ      ヽ  ノ |
 ̄ ̄ ̄ ̄ ̄ ̄ ̄ ̄ ̄ ̄ ̄


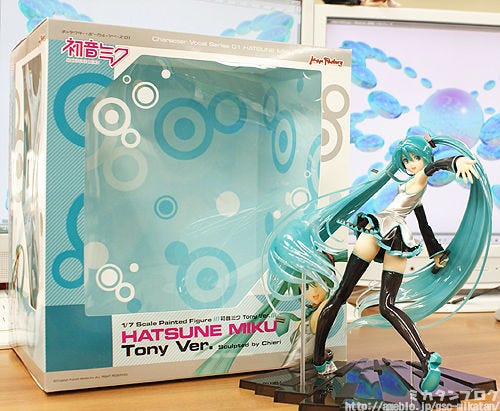
011

Miku Hatsune: Tony ver. !

   / ̄ ̄\
 /   ⌒ ⌒\ 
 |    ( ●)(●)                ___
. |   ⌒(_人_)            /      \    ”Tony Miku Please!”
  |     |r┬-|           /─    ─    \ 
. |     `ー’} \       / (●) (●)      \
.  ヽ        }    \    |   (__人__)      | 
   ヽ     ノ       \   \   ` ⌒´     _/
   /    く. \      \  ノ           \
  |     \  \    (⌒二               |
    |    |ヽ、二⌒)、      \         |  |

She was sent out from GSC on the 16th March!

Deliveries to certain areas cannot be made due to the recent earthquake, but as soon as possible products will be sent out.

For ordering details or questions please check out our partner shops.

All of our future products may be delayed due to shipping problems, planned blackouts and circumstances with the shipping companies, but we will strive to keep them all on the same schedule they are currently on. It’s hard to determine how things will turn out in the current circumstances, we hope everyone will understand!

That’s all for today!
I hope to see you all again tomorrow! (・∀・)ノ゛

(C)2009 Crypton Future Media,Inc ALL RIGHT RESERVED

* Please note that this blog’s contents is originally written for a Japanese audience and is then translated for our foreign customers. All pre-order and release dates are the Japanese dates. Also note that not all products can be sold in certain areas