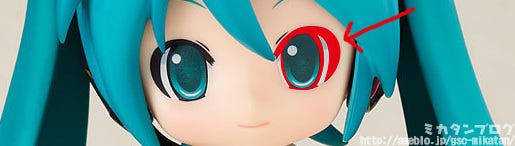
Painting a Nendoroid Expression Part 4: Preparing to Apply Color

Nendoroid Expression Painting: Day Four!
goodsmile company Mikatan's Blog English Version
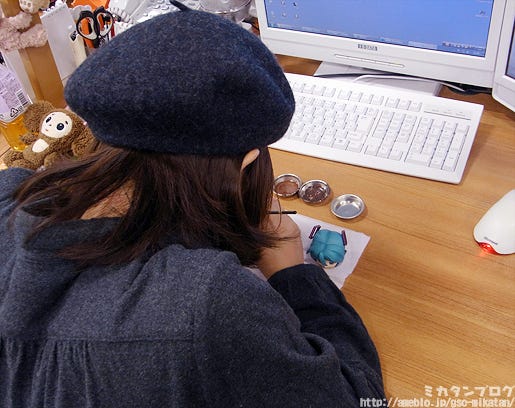
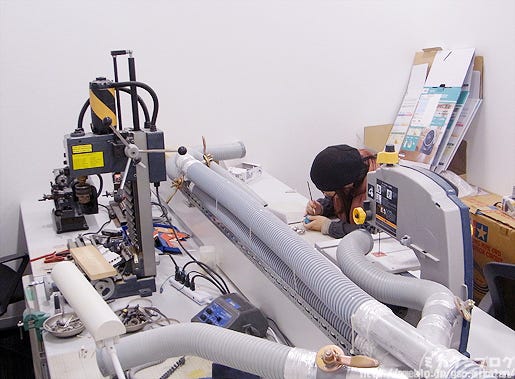
Today I’ll be borrowing a room from the production team!!

I’ve been working at my own desk up until this point, but the fumes from the thinner have been affecting me more than I expected, so I decided to move to a room that’s designed for things like this!

It means I’ll be working around a number of strange machines and tools, but I don’t mind confined areas, especially when I can get down to work on something I enjoy! (`・ω・´)
goodsmile company Mikatan's Blog English Version
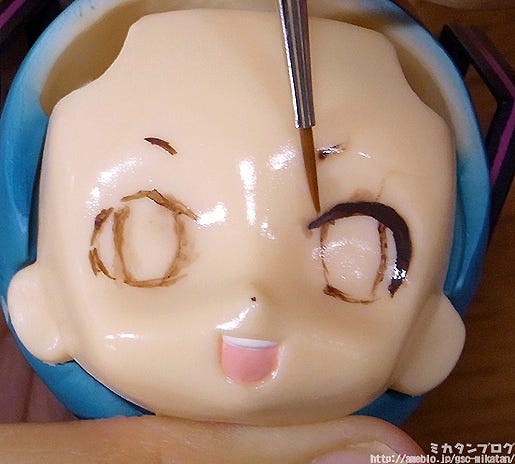
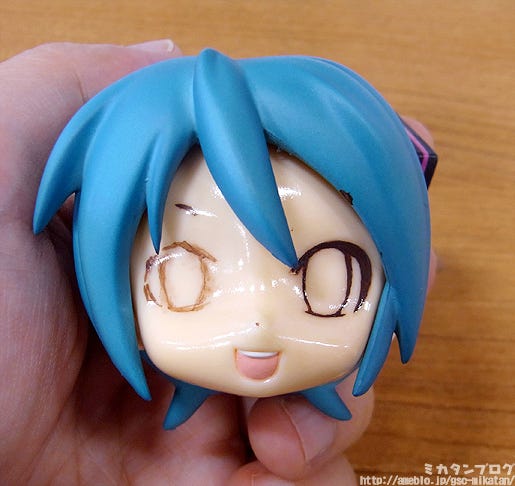
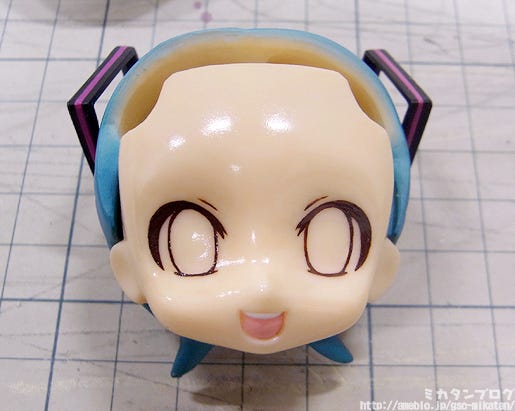
This is where we left off last time!

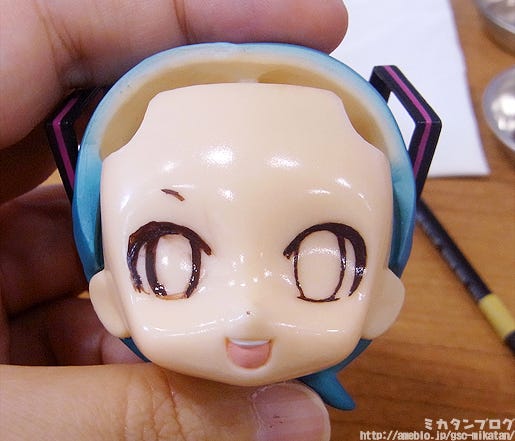
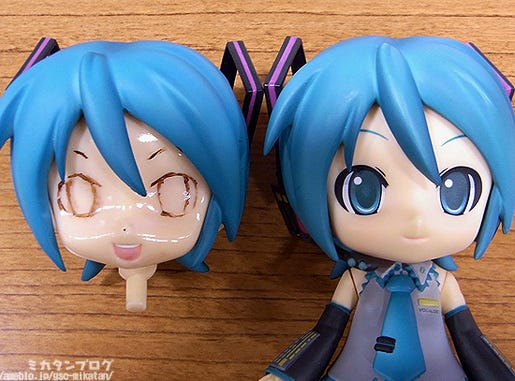
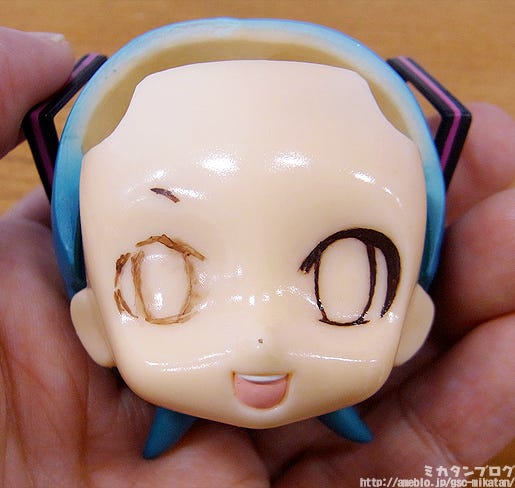
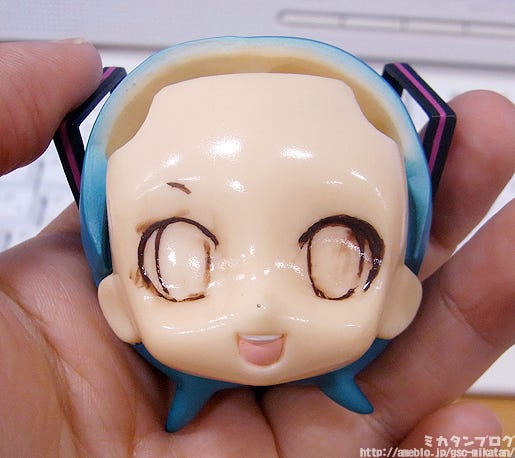
I had just finished the borders of the two eyes! I actually made a few more alterations after I was done with the previous blog… 😛

This is so much fun!

I had to keep working until I thought it was the absolute best I could do!
goodsmile company Mikatan's Blog English Version
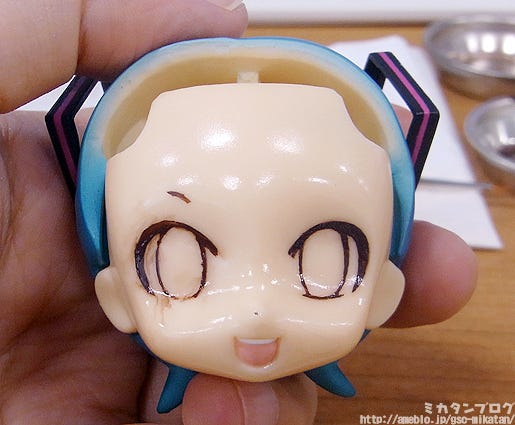
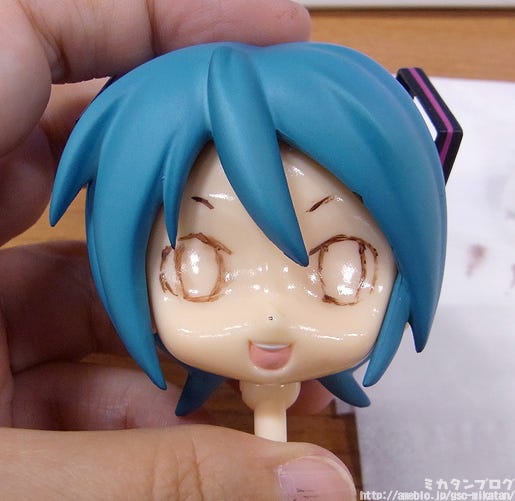
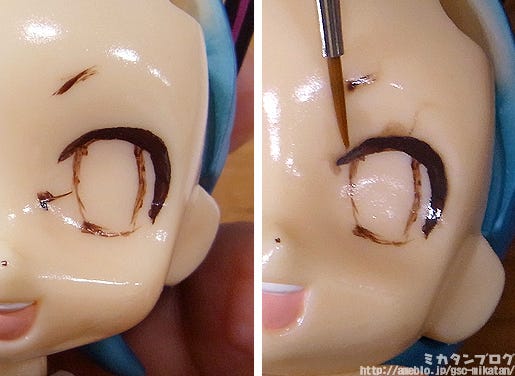
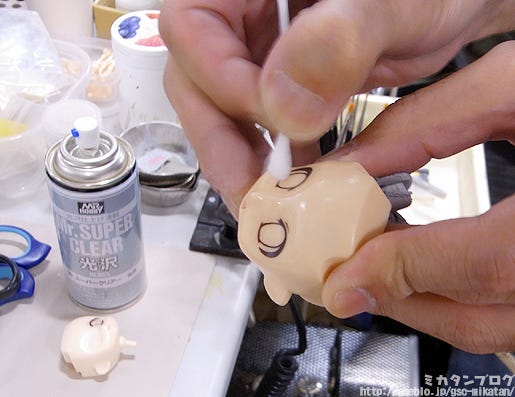
Soak a bud in water and clean off unwanted marks!

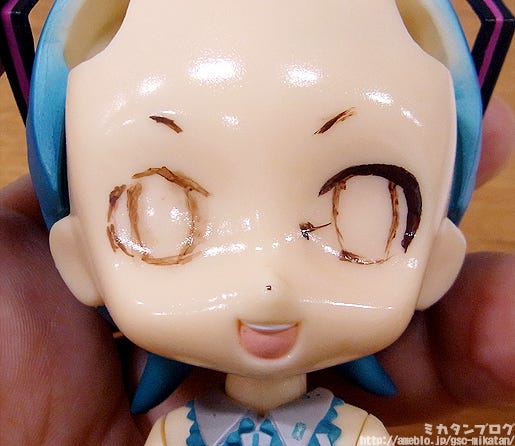
After a number of changes the paint tends to cling onto the face a bit, but you can just use some water (not thinner) on a cotton bud to clear away the unwanted paint.

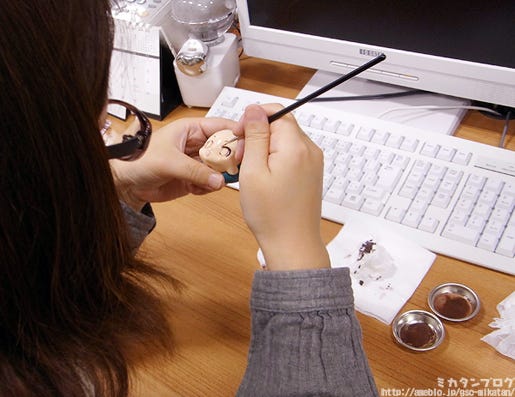
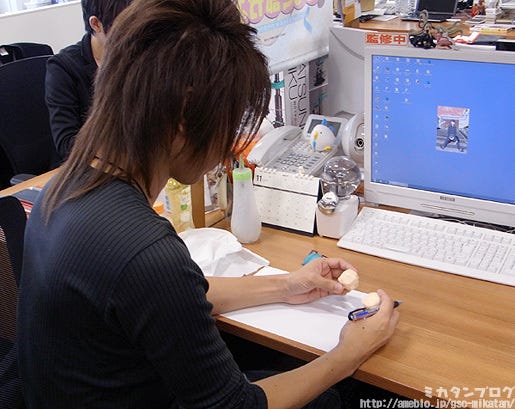
You’ll probably be quite surprised as to how dirty it can get while you’re working on it. This photo is actually Hiro-san cleaning it up for me – but I am doing all the actual paintwork myself! (`・ω・´)
015
Now it’s time to move onto the next step!

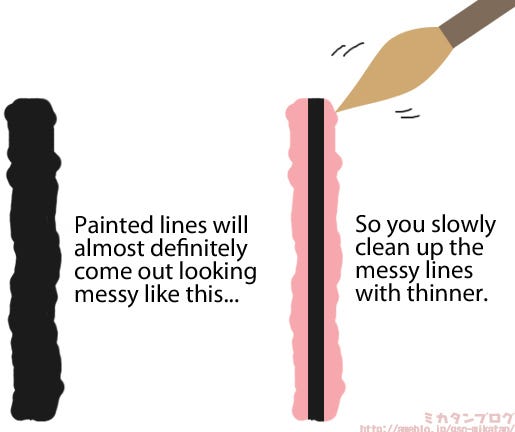
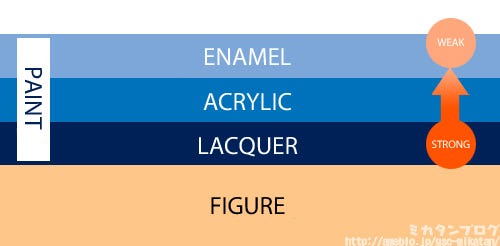
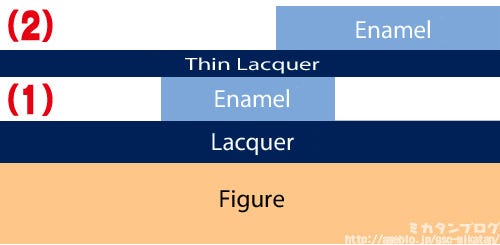
At the moment we have enamel paint on top of lacquer paint (1). Now I’ll be spraying on a thin layer of clear lacquer to ‘save’ the borders!

By doing that, the paint at (2) will not cause any problems with the painted lines at (1)!ヽ(゚∀゚)ノ

For more details on what I’ve done in the past, feel free to read the previous articles in this series:
Painting a Nendoroid Expression Part 1: Basic Knowledge & Tools of the Trade
Painting a Nendoroid Expression Part 2: Painting the Eye Border
Painting a Nendoroid Expression Part 3: Continuing to Paint the Eye Borders
004
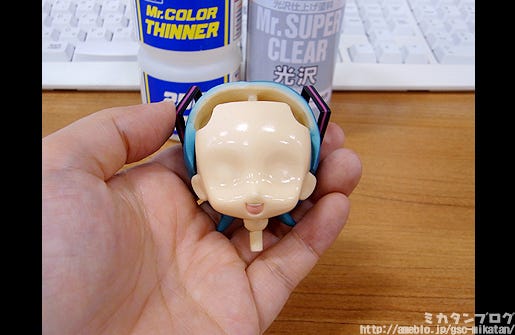
These are what you need for this step!

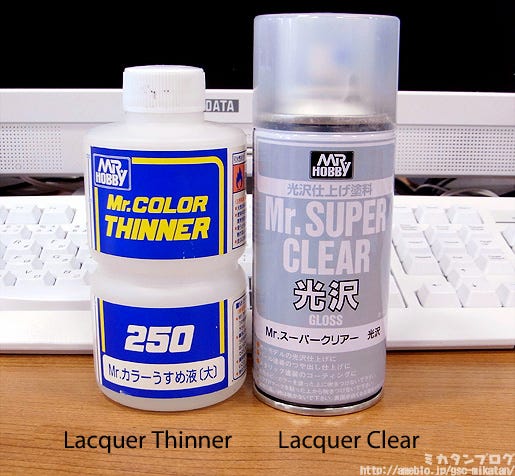
Lacquer clear, lacquer thinner and an airbrush!

These are all available at model stores – although I’m sure many of you are worried about how hard it will be to use the airbrush…
goodsmile company Mikatan's Blog English Version
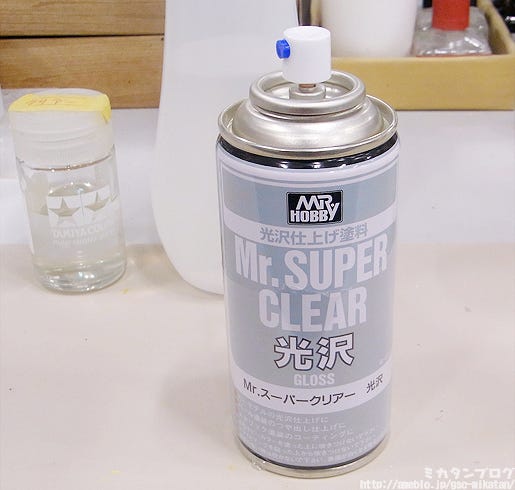
In fact, I am as well, so I’ll be using this instead!

A spray can that does the same job!

You can use this just as it is, so you don’t need to go through the effort of getting the airbrush ready! As a newcomer to all this, I think it’ll be much better for me to use the easier option…
goodsmile company Mikatan's Blog English Version
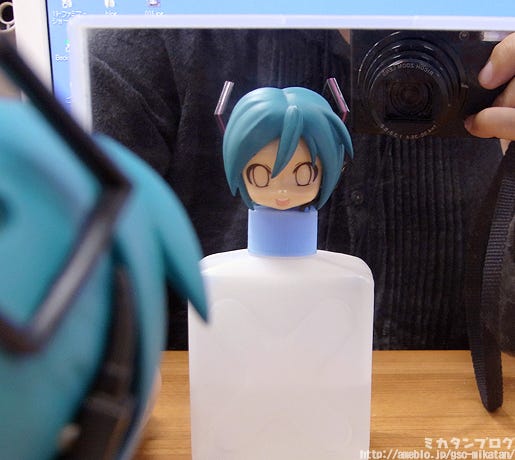
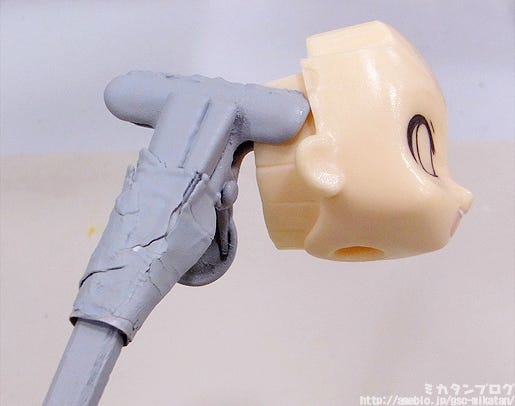
Secure the expression with a clip!

Make sure the clip is securely in place with some elastic bands or tape. I’m borrowing a clip normally used to apply surfacer, that’s the only reason it looks all gray – so don’t worry about that.

Right, let’s get started!!!

I’ve spent about 20 hours painting these lines on, so I’m really nervous now… I don’t want to mess the whole thing up now!
goodsmile company Mikatan's Blog English Version
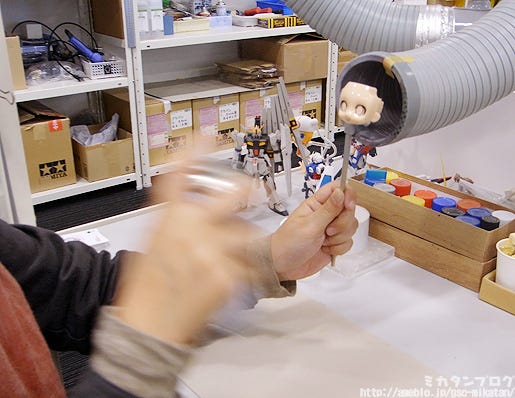
There is a technique to the spraying!

・ Don’t press the sprayer down too hard! Just half way is fine!
・ Hold it about 20cm away and spray, moving left and right 2~3 times!
・ Make sure to cover it completely, and also try to ensure it is evenly distributed!

If you spray too close you’ll end up applying too much, so make sure you are far enough away from the expression when spraying! (Although, if you’re too far it won’t coat properly at all, so you really need to try and find the perfect place.)

You can’t just spray it all quickly at once, or else the enamel paint will dissolve! Σ(゚Д゚;)

If you remember from before, the eye borders are made with enamel paint, and lacquer will cause it to dissolve. But to help avoid this…
goodsmile company Mikatan's Blog English Version
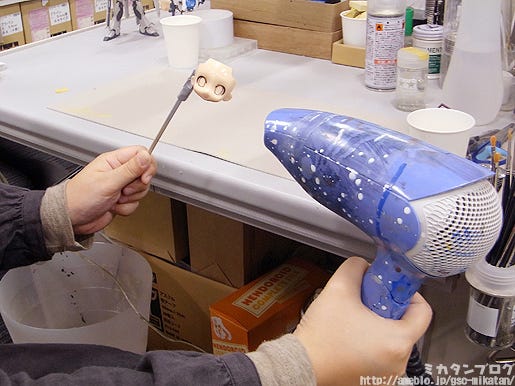
Dry with a hair drier after each layer!

Repeat this process about three times!

You don’t finish the coating all at once, but instead repeat this spray/dry process a number of times. By doing this, you can avoid having the eye borders dissolve from the strength of the lacquer!
goodsmile company Mikatan's Blog English Version
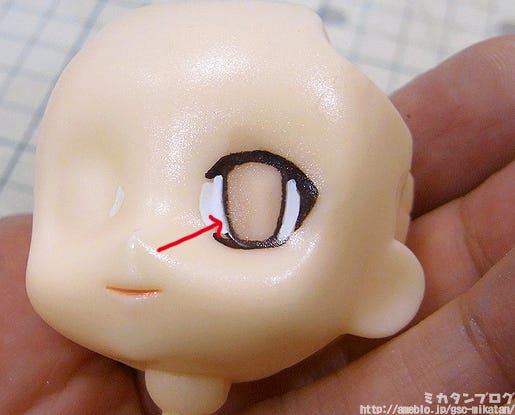
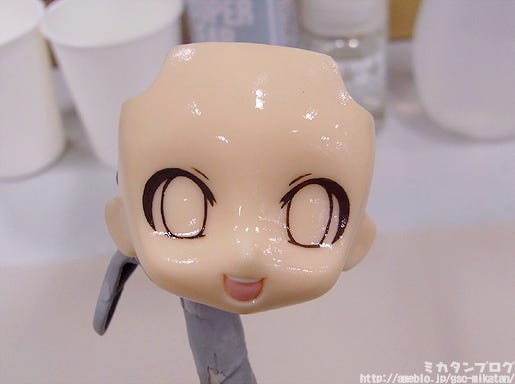
This is an example of a failure!

I was scared to try on Miku first so I tested the distance I should be spraying at on this expression first. This example only used a single coat of of lacquer clear, but because of that the coating was too thin and the enamel thinner caused the eye borders to dissolve…

You can’t spray on too much, and you can’t spray on too little… it’s a very fine balance that requires a great amount of care!
goodsmile company Mikatan's Blog English Version
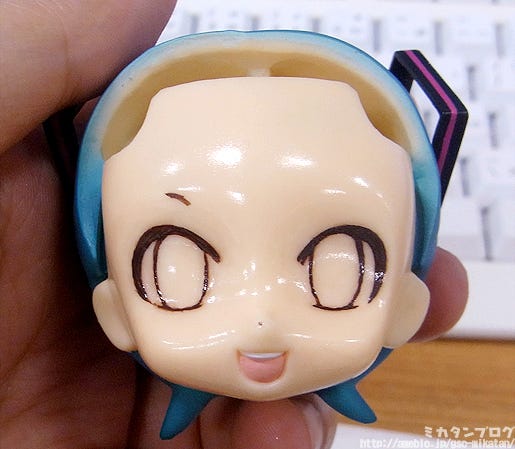
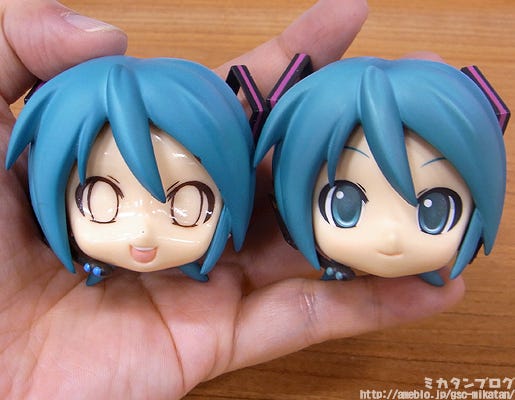
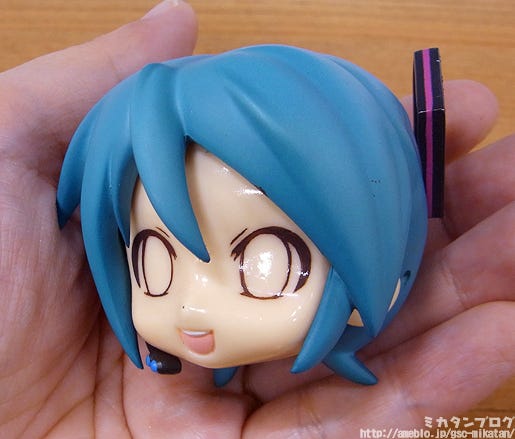
The expression should appear glossy at this point!

Ooh! I think I’ve managed to get it right!! Yay!! Now I’ve got my layer of lacquer on top of the eye borders!

Of course that means I can no longer change the borders! (((゚Д゚)))
goodsmile company Mikatan's Blog English Version
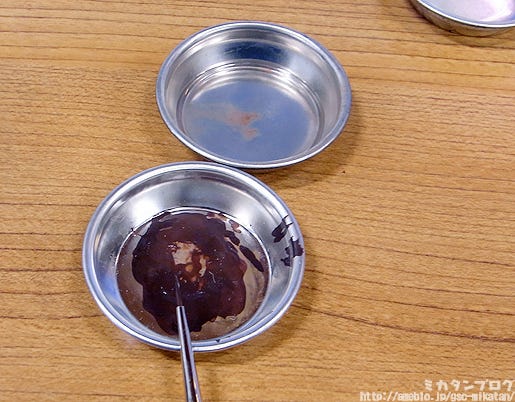
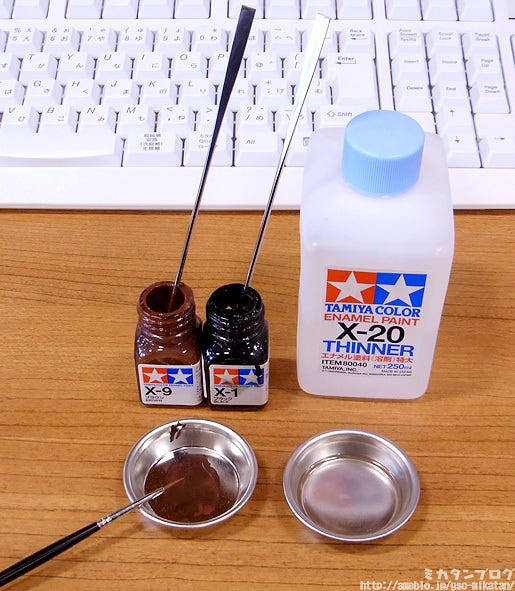
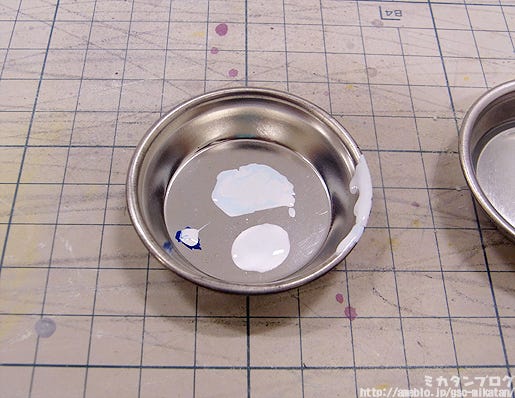
Mixing the color for the white of the eyes!

Oda-P said I could just use white, but I decided I wanted to mix a little bit of blue in anyway! (I guess we’ll find out if it was a good idea later…)

The tools I’m using were all introduced in the first post of this series, which you can find here: Painting a Nendoroid Expression Part 1: Basic Knowledge & Tools of the Trade
goodsmile company Mikatan's Blog English Version
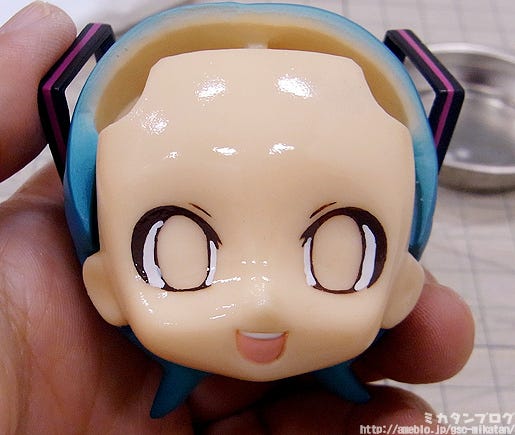
Painting the white of the eyes!

Of course with my amateur skills I didn’t manage to paint them neatly within the borders…

The white here is clearly going over the borders – but this is exactly why we sprayed the lacquer clear on top of them! Now we can simply use enamel thinner to clean up the areas where the white is crossing the borders, and it won’t affect the eye borders at all thanks to the layer of lacquer.
goodsmile company Mikatan's Blog English Version
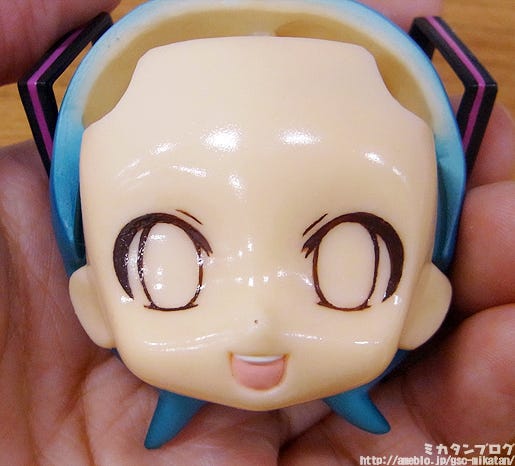
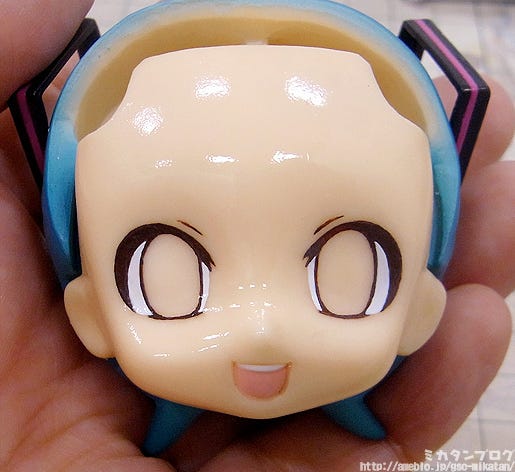
Complete!!!

I’m finally getting somewhere with my expression!! It’s so much fun to slowly but surely make progress like this!!

Although as I paint the color inside, the differences between the two sides becomes more and more clear… (‘A`)

In fact it already looks completely unsymmetrical…

But this is the best I can do right now, and I’ll be sure to see it all the way through!

I’ve really had a lot of support from all the sculptors here at GSC, and I’m very grateful for all their advice and help! If there was anything I didn’t understand they would quickly come to my rescue and give me some directions when I was worried about something.

I hope that everyone reading through these posts is enjoying them as much as I’ve been enjoying trying to do this myself, and I’ll be continuing this special corner the next time I have some free time!
Anyway, that’s all for today!
I hope to see you all again tomorrow!! (・∀・)ノ゛
(C)Crypton Future Media, Inc. www.crypton.net

Minicchu IDOLM@STER Cinderella Girls

Oooh!! Is that what I think it is?
001
I’ve been waiting for them to be finished!!

Takamatsu from Phat Company is carrying a little suitcase, and based on the image I can just make out on it, this blog is going to be dedicated to the two and a half million IDOLM@STER producers out there!
002
Phat! Company’s:
Minicchu IDOLM@STER Cinderella Girls 01!

Based on the social game released by Mobage, ‘IDOLM@STER Cinderella Girls’ comes a set of cute chibi figures based on illustrations by Kengou Yakumo – the first in a new series of figures by Phat Company called the ‘Minicchu’ series. Put together your very own miniature idol unit with your favorite idols!

They’re so cute!!

Phat Company has released something absolutely incredible this time around! I’ll definitely be buying a set for myself, there is no way I could resist these!

They’re so lovely I almost feel like just ending this blog now and playing with the prototypes all day long… another hard day at work! 😛
003
This is how the look from the back!

You can easily make out who is who just by looking at the hairstyles!

There are a total of eight to collect, including one secret figure!

I think many will be trying to guess who the secret character is, but there are many idols in the game that it’s actually quite difficult to guess!
007
Let’s take a closer look at the idols!

First up, Kirari Moroboshi!

Each of the idols in IDOLM@STER Cinderella Girls has a certain type – either cute, cool or passion. Both the Minicchu figures here as well as the Nendoroid Petites coming from GSC have a nice balance of the different types! Kirari here is a ‘passion’ type!

Each of the idols also comes in a six different rarities in the game – there is ‘Normal’, ‘Normal+’, ‘Rare’, ‘Rare+’, ‘S-Rare’ and ‘S-Rare+’. The characters have different outfits depending on which rarity you have!

This series makes use of outfits from the ‘Normal’ and ‘Rare’ cards!
006
There are two more passion types:
Natalia and Nina Ichihara!

Natalia is an idol from Brazil known for her tanned skin and Nina Ichihara is a nine year old idol who wears cute animal outfits – here she is wearing the fluffy sheep outfit from the ‘Rare’ card. I always thought the card was cute, but she looks even cuter in figure form!
004
Next up, the cute-types:
Anzu Futaba and Kanako Mimura!

Anzu-chan became a meme in the Japanese Internet as ‘AnzuChang’, which was actually how I first found out about the game! Even though the figure is so tiny, you can still easily make out the writing on her shirt which reads ‘If you work, you lose’ – it really gets her lazy personality across to everyone! Her long twintails are also lovely!!

Kanako-san is based on the ‘Normal’ card which features an illustration that shows off her great body! Just as with the illustration, you can see her arms are holding up her very impressive bust! Wonderful!!

Shuu-chan from the planning team really loves Kanako, and is trying to make all of his front members Kanako in the game! 😛
005
Finally, the cool-types:
Kaede Takagaki and Rin Shibuya!

Kaede has lovely hair that curls in at the ends as well as two different colored eyes – the figure is based on the ‘Rare’ card! The unique color of her hair was adjusted multiple times with lots of input from the publishers to ensure it came out perfectly! The sculpting also manages to keep the wonderfully mysterious aura about her!
008
Phat! Company’s:
Minicchu IDOLM@STER Cinderella Girls 01!

They’ll be up for preorder from the 16th November!

Get in contact with our partner shops if you have any preorder or sales queries!
009
Bonus Shot!

The prototypes all came in this lovely looking case! Opening it up looked so colorful and cute that I had to take a picture! I feel like I should make my own transparent case to carry around my favorite figures too! (*´∀`*)

Anyway, that’s all for today!
I hope to see you all again tomorrow!! (・∀・)ノ゛

 
© NBGI

Nendoroid Aichi Sendou

Aichi is watching the battle…

001
An epic cardfight between GSC staff!

Cardfight!! Vanguard has been popular in the GSC offices for quite some time now – so much so that we’ve even established a ‘Vanguard Training Class’ run by some volunteers to explain the rules to the staff who didn’t understand how to play!

But anyway, I’ve started out today’s blog with this cardfight scene because today I’ll be looking at this lovely Nendoroid!! (`・ω・´)
002
From Cardfight!! Vanguard:
Nendoroid Aichi Sendou!

From the anime series ‘Cardfight!! Vanguard’ comes a Nendoroid of the shy character with a gentle heart, Aichi Sendou! He comes with three different expressions as well as a number of optional parts for you to recreate your favorite scenes from the series!

When the prototype first went on display, we received an amazing response from all Aichi’s female fans!

I received a bunch of tweets as well as emails with thank yous, along with many requests for Kai to be released too! Thank you to everyone for the amazing response!
003

This is how he looks from the back!

Aichi’s hairstyle is very hard to sculpt into a figure, but after looking around at all sorts of angles I can’t find any faults at all – it looks great all around! His hair is a very important aspect of him, so it had to perfect!

He also comes with a Wingal figure to fight beside him!

The Wingal figure looks ready for action! He is so cute!! (´∀`)
004
“Ride on Wingal!!”

Aichi also comes with a shouting expression, which really is ideal for the Cardfight!! Vanguard universe! (`・ω・´)

Obviously he also comes with some Nendoroid-sized Vanguard cards – it literally wouldn’t be a cardfight without them! Posing him like this shows off the cooler side of his normally shy personality!!
005

Pose him together with the Nendoroid Petite: Cardfight!! Vanguard Grade 01 series!

The Nendo Petite Vanguard series is already on sale, so you can grab them to display alongside Aichi to increase the number of units he has summoned! Here you can see I’ve placed Blaster Blade by his side – one of the most important units to Aichi!

Plus each of the little Nendo Petites is just ¥315!!
006

The prints on the cards are so intricate!

Each card is just 1cm x 0.8mm in size! They’re so tiny, but you can still easily make out that they are the Wingal and Blaster Blade cards!

Plus it’s great that you get two different cards, giving you the choice to display Aichi holding either of the two in his cardfight!

So… let the cardfight begin!
007
A cardfight against another character!!

If you attach Aichi’s hand parts to other characters, you can recreate a cardfight scene just like this!

Aichi actually comes with two different hand parts for holding the cards – one with Aichi’s Vanguard fight glove and another one that was just skin colored – I wasn’t sure why at first, but now I see that the skin colored hand allows you to pose other characters having a cardfight against him!
008
He also comes with an embarrassed face!!

I know everyone was hoping to see this expression, so of course it has been included!! He has a slight pink blush together with an innocent upward glance…

Definitely an expression fans can enjoy to their heart’s content!

It doesn’t seem that amazing when compared with the adorable expression, but he also comes with a card case to hold his deck which he is holding in his left hand here!

009

Bonus Photo: Evil Aichi!

This expression isn’t included with Aichi, it actually belongs to Nendoroid Hibiki Tachibana, but I decided to try it on anyway!

002

From Cardfight!! Vanguard:
Nendoroid Aichi Sendou!

He’ll be up for preorder on the 15th of November!!

Get in contact with our partner shops if you have any preorder or sales queries!

 
Last but not least, let me leave you all with a little bonus info!
Toshiki Kai will also be getting the Nendoroid treatment!

 
But that’s all for today!
I hope to see you all again tomorrow!

 
(C) bushiroad All Rights Reserved.

Hacker (Chelsea)

Wait, Nitohei! Let me see that figure!!

001
You were about to send it off to China, weren’t you…?

Max Factory’s scale figures often seem to head to China very early in the production process which makes it very hard for me to get hold of them…

But there is no way I’m going to let someone pack a figure up and send it off right before my eyes!! 😛
002
7th Dragon 2020
1/7th Scale Hacker (Chelsea)!

A figure is based on an illustration by Shirow Miwa and takes care to faithfully reproduce all the small details and frills of her outfit as well as her long and flowing twin-tailed hair! She has a rather glum expression on her face that captures her personality nicely, so fans can truly feel like they have the Hacker by their side!

The first time we saw this lovely figure was at the last WonFes, but now she is being officially announced!! She is actually very popular with a group of GSC employees!
004
This is how she looks from the back!

An incredible rendition of the unique character illustrated by Shirow Miwa!

It’s a 1/7th scale figure, so it is slightly bigger than the normal 1/8th scale figures. The size gives her an amazing presence that fans should really be satisfied with if they put her on display!
006
Such an elaborate design!!

The lacing on the jacket along with the inner blouse are both incredibly detailed, and that’s only mentioning the upper body – the rest of her outfit is equally impressive! The figure was sculpted by Sawachika-san who has truly done an amazing job!
012
Such thin thighs… they’re lovely!

I’m sure most of you will know I’m normally a fan of more sensuous looking thighs, but the little gap between these legs has captured me nonetheless! Not to mention those striped tights!!

It’s definitely a look that suits slim girls like the Hacker, and allow the curves of her body to have their own special charm!
003
A somewhat apathetic expression!

The expression also matches Shirow Miwa’s illustration perfectly! I was really impressed by the little yellow line around the eyelashes – it’s just a few millimeters in size!
005
Such delicate looking fingers!

The way the fingers are sculpted make it seem like they should be soft to the touch! Just look at the detail put into the joints along the fingers and even the nails!

It really just looks like they took a real hand and shrank it down to figure size!
007
Her lovely little bunny plushie!

The way the ear has been sculpted flopping down from her hand really gives the impression that gravity is pulling down on it! Plus just like with the original illustration she is stepping on the bunny’s other ear!

It’s quite interesting to compare the bunny on the figure to the original illustration, you might notice a few tiny changes that were made to accommodate the figure!

– 7th Dragon 2020 Hacker –
http://dragon2020.sega.jp/character4.html
008
The twin-tails have an interesting texture!

Well, technically it’s not a texture… it’s just paintwork that makes it look like a texture – but its impressive to look at either way!

It’s actually quite hard to make it out in this photo, but there is a grainy paint used on the darker gradient to give the textured appearance. This grainy look contrasts quite nicely with the delicate body which all comes together to create an exquisite figure for fans to enjoy! You really need to see this with your own two eyes to truly appreciate it!
010
This is how she looks from the side!

I normally don’t use completely horizontal photos like this on the blog, but I had to show this one – those twisted twin-tails look absolutely lovely from this angle!

On the illustration you could only ever see the front of her, but with a figure you can look at her from any angle you like!
009
My favorite picture for today!(´∀`)

002
7th Dragon 2020
1/7th Scale Hacker (Chelsea)!

She’ll be up for preorder from the 15th November!!

Get in contact with our partner shops if you have any preorder or sales queries!

Also don’t forget about the previously announced Samurai from the same series!: http://www.goodsmile.info/product/en/3594/
Anyway, that’s all for today!
I hope to see you all again tomorrow!! (・∀・)ノ゛
(C) SEGA

Painting a Nendoroid Expression Part 3: Continuing to Paint the Eye Borders

The project I started on a whim…
Nendoroid Painting, Day 3!

010
It’s been quite tight on my schedule to keep this up, but the right eye has come out looking really nice so I’m really exited to get back to work on it now!! (…at least, I thought it looked nice :P)

I’m a little bit clumsy with my fingers, but I really like making things like this so I don’t really mind if it doesn’t come out perfectly! Although I definitely did have some frustrating times while working on it, it has all been worth it!
goodsmile company Mikatan's Blog English Version
Today I’ll be continuing to work on the eye borders!

I’m using the exact same setup as I did yesterday. If you leave the paint in the tray for a day it’ll harden up, but you can use thinner to return the hardened paint back into a liquid form.

As a side note, when you mix colors together, always consider using a little more than you think you’ll need… it’s better than having to try and mix up the exact same color again!
goodsmile company Mikatan's Blog English Version
Time to work on the left eye!

Now that I’m looking at this photo myself I can see the lines I made were definitely much too thick here. It’s better to have the paint more fluid and not as thick as I have it here – it’ll help in painting finer lines.
goodsmile company Mikatan's Blog English Version
Cleaning up the lines with thinner!

I painted the right eye border on relatively easily, but for some reason the left eye just isn’t working out! I’m told there are two reasons for this!

・ It’s harder for right-handed people to draw the left eye!
・ You’re trying to create symmetry with the right eye!

Now that I think about it, it’s also harder to draw the left eye for me on illustrations – it’s the same concept just in figure form! Plus I need to worry about making the left eye look symmetrical to the right eye… this isn’t going to be easy…
goodsmile company Mikatan's Blog English Version
I’m definitely making some progress!

But… something definitely doesn’t feel right…

Something I only managed to notice now…
goodsmile company Mikatan's Blog English Version
The eyes are too high!

I didn’t notice this at all when I had only completed the one eye! Apparently it’s actually a mistake that lots of newcomers to Good Smile end up making.

After all my hard work I didn’t want to believe that I was going to have to do it all again…

goodsmile company Mikatan's Blog English Version
In my depressed state, Hiro-san and Mesuka gave me some interesting tools to work with!

Hiro-san is the sculptor responsible for the BRS and Dead Master Nendoroids, and Mesuka sculpted the Nendoroid Petite Madoka Magica figures! They came to my rescue in my time of need!!

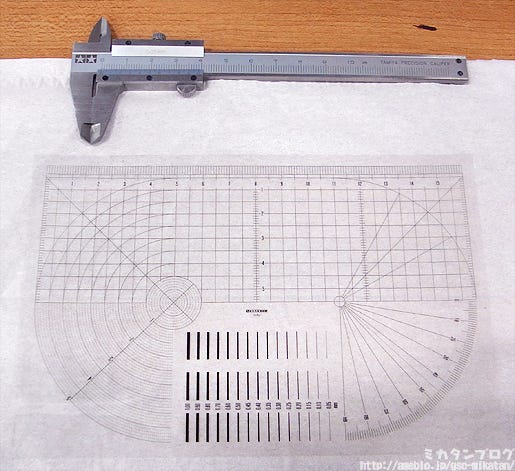
The tool at the top of this photo is called a Vernier scale, which measures the width of things (in this case, the size of eye). The tool at the bottom is to ensure that different parts are level.
goodsmile company Mikatan's Blog English Version
Let’s try using it!

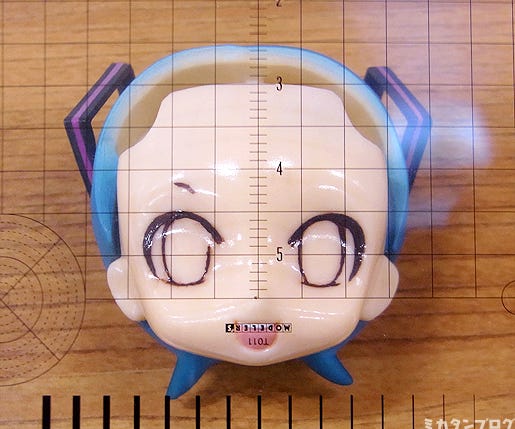
Using the Vernier scale seemed a bit too far past my level, so I decided to make use of this transparent ruler-like tool. As you can see, the upper eyelashes and outer eye lines aren’t actually matching up at all…

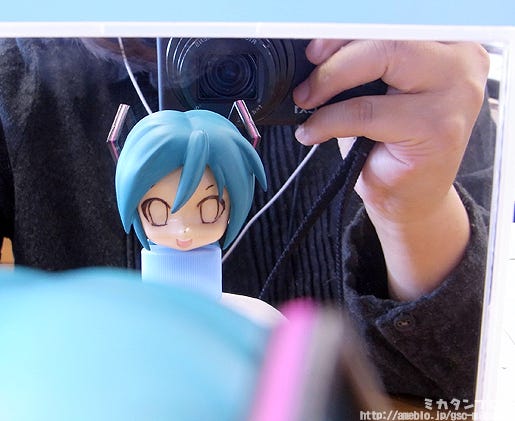
The fact that I’m doing this has now spread across the offices, so a lot of the sculptors stop by to see how I’m doing… when Kawara-san came by he told me I should take a look at my paintwork in a mirror…
goodsmile company Mikatan's Blog English Version
━━(||゚д゚)━━━ !!!!!

It looks terrible!!

Not only are the eyes at different heights, they’re not even remotely symmetrical! They look completely distorted!

It’s hopeless! I’ll have to do it again!

goodsmile company Mikatan's Blog English Version
This time I’ll pay attention to height and symmetry!

I’ve fixed up the eyebrow and I’ve been moving the eyes downward… but…

Every time I fix something, the balance breaks somewhere else and that needs fixing! It’s an endless spiral of corrections!

At one point I just became completely lost as to what I was trying to do anymore. I couldn’t tell which lines were the right ones and which ones I wanted to erase…
goodsmile company Mikatan's Blog English Version
I will get this looking right!

I want to go back in time and hit myself for ever thinking this would be easy.

Anyway… I kept at it while looking at it upside-down, from the sides, from the top and in the mirror from earlier, slowly but surely painting and then erasing lines until I felt it the lines were starting to look better. The thinner has quite strong fumes, so you also need some willpower to overcome those and continue to work… 😛

It’s been a total of ten hours now…
goodsmile company Mikatan's Blog English Version
Complete━━(゚∀゚)━━!!!!

This post is obviously cutting out quite a lot… I actually ended up completely erasing and redoing the right eye again. It really wasn’t going how I wanted it to, so I erased the whole thing and once I started from scratch again it actually came out looking much better – determination is the key to success!

Plus, if I ever do this again I’ll know not to just work on one eye at a time, but to work on both and keep a good balance between them!

There is however personal differences on how exactly you prefer to do it, for example Hiro-san says he does 70% of the one eye and then 30% of the other, and then goes back and finishes them up. I guess it’s just up to you to find the way that works the best for you – practice makes perfect!

goodsmile company Mikatan's Blog English Version
Comparison Shot!

goodsmile company Mikatan's Blog English Version
A look from a different angle!

goodsmile company Mikatan's Blog English Version
This is how it looks in the mirror!

I guess the symmetry looks okay… although that one eye looks a little off… is it?

Arrgg!! I think it is!!
But if I change something now it’s just going to end up throwing the balance off somewhere else, so I’m going to have to move on like this for now.

…to be honest, I meant to complete the painting in three posts.

But now I can say with confidence that this is just like playing some kind of impossible game… it’s fun, but it’s certainly not easy! To think that Oda-P can complete this neatly in a day and a half… I have a new found respect for him!
a
But anyway, with the borders out of the way we can move onto using some color! I can save my game here and continue another day!

But unfortunately I can only load that save once…

Now I’ll be using an airbrush to paint a think lacquer layer over the eye border – a very thin layer. But wait… shouldn’t the weak enamel paint be dissolved if lacquer paint is painted over it?

Normally that would be the case, and all my hard work drawing the eye borders would go to waste… but that’s exactly why you need to make a very thin layer!

I’ve never used an airbrush before… I wonder how this is going to turn out…

Oda-P (Currently Overseas):

“In the worst case scenario the paint will get smudged. It’s something that every newcomer had to go through, so don’t worry.”
(((( ;゚Д゚))) I’m worrying!!
Anyway, I only managed to finish the borders of the eyes for now… but this special corner will have to go on hold for awhile! As soon as I have a bit of spare time again, I’ll continue with my painting attempt! (To be honest, I really want to continue right now, so hopefully it won’t be long!)

Next week we’ll be taking a look at a couple of new prototype figures, so look forward to them!
Anyway, that’s all for today!
I hope to see you all again next week!! (・∀・)ノ゛

(C)Crypton Future Media, Inc. www.crypton.net

Painting a Nendoroid Expression Part 2: Painting the Eye Border

Nendoroid Painting Part 2!

Last time we took a look at the tools, but this time around I’m going to actually start with the painting!

goodsmile company Mikatan's Blog English Version
I should really hurry up and get started, but first…

This photo is to scale!

The Nendoroid head looks so much smaller when you know you’re going to be painting on it yourself!

goodsmile company Mikatan's Blog English Version
First off, I drew on some rough lines!

I drew these on while the fringe was attached to make sure they were in a good position. I’ll explain more about these rough lines a bit later, but basically they can be erased easily so it doesn’t really matter how messy they look!
goodsmile company Mikatan's Blog English Version
The road to success is to copy the best!

I definitely need something to base my painting on seen I don’t have any real experience, so I’ll be copying the eyes from this Miku Nendoroid!

I know very well that I wouldn’t get very far if I tried from scratch, so I’ll keep this Miku on the side as a reference model!

goodsmile company Mikatan's Blog English Version
I decided to start with the upper eye lashes!

Unfortunately they seem to have come out a bit thick and crooked… I also managed to brush some paint onto the left side of the eye… I’m sorry Miku!!

But you don’t just paint once and be done with it! You need to paint and erase over and over again until the expression looks right!

Let me try explain with a picture!

007
The left represents what I’ve done so far!

Now I’ll take the wobbly paint lines and make them look neater by using enamel thinner! In other words I’ll basically be erasing the pink section on the image above, to create a straighter, neater line!

That’s the basics of it least, so let me give it a go!

goodsmile company Mikatan's Blog English Version
Cleaning up the outer eye!

Here I’ve actually used too much thinner, which is causing the paint to smudge a bit!! At least the line itself does look a little bit neater!
goodsmile company Mikatan's Blog English Version
A comparison of the two!

You really only need the tiniest drop of thinner, I used too much (Just dab a small amount on the brush and then dry it a little bit before applying it to the figure). You don’t need to worry about the smudges as they can be cleaned up quite easily later on.

010
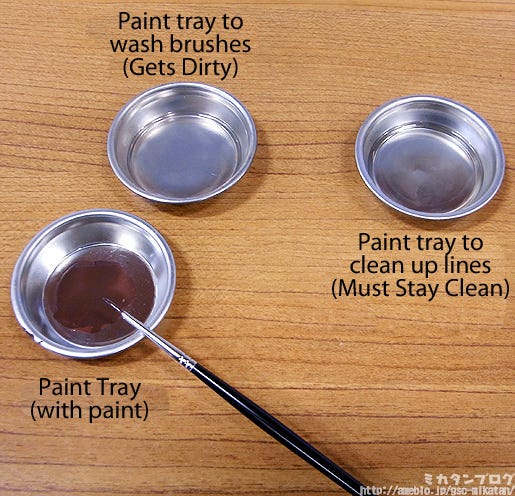
You’ll need three paint trays!

The top two filled with enamel thinner.

The one on the left is to clean the brushes. Once paint collects on a brush it’ll slowly get harder and harder to use, so make use of the enamel thinner to clean off the paint from them when you’re done with a color. That means that the thinner on the left can get dirty without a problem – you’re just using it to clean off the paint.

The one on the right is for thinner used for cleaning up the lines as I was previously doing on Miku. You need to keep paint out of this thinner, as if it gets dirty you won’t be able to remove the unwanted lines neatly. If you think it’s looking a little dirty, consider replacing the thinner with some fresh thinner to continue your work.

Its best to have two brushes, one for paint and one for thinner!

I was using a single brush for ages, and only after awhile did I realize it would be much easier with a second. ^^;

goodsmile company Mikatan's Blog English Version

After erasing and painting on over and over again…

2 and a half hours have passed!!

… and I’m still having fun!!

You really have to concentrate or you make mistakes so easily… but the thought of completing Miku’s expression is enough to keep me going!!

I also get the feeling that people who are good at drawing will find it much easier to draw the expression on than others. The main difference would probably be the fact that you need to keep the face stable with one hand while drawing with the other – it’s really not that easy when you’re not used to it…

Oda-P gave me some advice, saying that I should hold my pinky finger to the head part to help keep it stable, and it really did help me quite a lot! If you’re trying this for yourself, be sure to try the pinky trick!

goodsmile company Mikatan's Blog English Version
One eye complete━(゚∀゚)━!!!

The lines look a little wobbly still, but I think it came out looking alright! Yay!

goodsmile company Mikatan's Blog English Version
I put the hair part back on!

Looking good!! Σ(゚∀゚三゚∀゚)

Everyone said the expressions were really hard to work with, but I think this will come out looking great!! Maybe it’s time for me to leave the WEB team and join the Nendoroid team!

…or so I thought…

But then I found out…

the hard part was just about to begin…
I’ll be continuing this blog tomorrow!!
I hope to see you all again then!! (・∀・)ノ゛
(C)Crypton Future Media, Inc. www.crypton.net

Painting a Nendoroid Expression Part 1: Basic Knowledge & Tools of the Trade

If there is one thing I’ve always wanted to try ever since I joined GSC, it can only be trying my hand at…

Painting a Nendoroid expression!

Nendoroids are known for their big heads and thus their big eyes – because of this the way the eyes are drawn is a very important element of any Nendoroid!

Everyone here at GSC seems to agree that the most pressure when making a Nendoroid comes from trying to get the eyes right… but even so, I’ve decided to take up the challenge as an amateur!

I have a 3-day time-limit!

Although I have other work to do, so maybe only two… I know there are many of you who are looking forward to product and prototype reviews, but sometimes I think its good to have a few articles like this one!

Just give me three days!! ^^

goodsmile company Mikatan's Blog English Version
Anyway, I want to get started but I don’t know where to start, so I’ll start off with a lecture from Oda-P!

Thanks, Oda-P Sensei! (`・ω・´)

Oda-P was one of the founders of the Nendoroid series – he sculpts and paints them himself! He does almost everything!!

Oda-P: “You really want to do this? Who are you going to paint?”

Mikatan: “I was thinking Miku would be good…?”

Oda-P: “Miku is really difficult… but let’s give it a go.”

Mikatan: “Around how long does painting an expression take?”

Oda-P: “For someone as serious as Kawara-san or myself, about a day and a half. For newcomers it could take as long as a month.”

Mikatan: “(((゚Д゚)))!!”
Well, I’m still going to give it a try!!
008
Starting with an explanation of the paints!

There are three different paints, each with a different strength – lacquer, acrylic and enamel paints.

Lacquer is the strongest, followed by acrylic, with enamel being the weakest paint.

In other words, you can’t paint lacquer paints on top of acrylic or enamel paints as the strength will cause them to dissolve, but you can paint enamel paint on top of acrylic or lacquer paints. If you want to paint different types of paint on top of one and other, you need to follow the image above.

I actually introduced this concept on the blog before on the DIY Figure Repairs Part 3: Scuffed Paint post. You can find out a bit more info from that post!
003
Lacquer Thinner and Lacquer Clear!

These will also be needed – they can be found in most model stores!
http://mikatan.goodsmile.info/en/wp-content/uploads/2015/10/o0515042212272142000.jpg
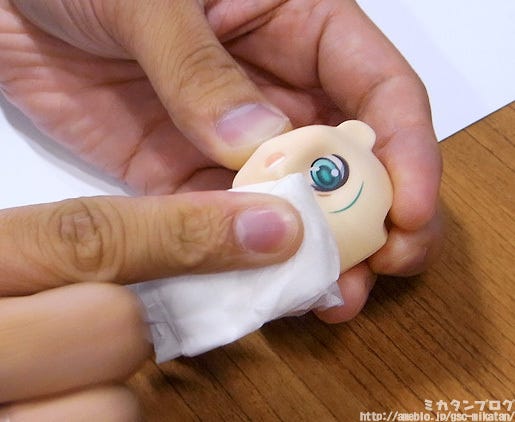
Wiping the lacquer thinner on Miku’s eye!

This expression part had some scratches on it, so we decided to use it for this article. Just place some lacquer thinner on a tissue and gently stroke it against the eye of the expression. It has some fairly strong fumes, so be sure to do this in a well ventilated area!

goodsmile company Mikatan's Blog English Version
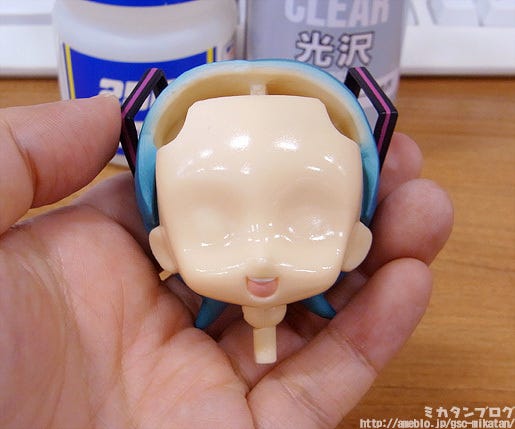
The eye disappears completely!

Amazing! I guess that means I can start painting on my own expression now?

Not quite yet… the lacquer thinner will leave the surface a big rough which will cause the colors to run, so first…
goodsmile company Mikatan's Blog English Version
Rub on some lacquer clear!

It makes it so smooth and shiny!! It’s just like when they pour concrete onto a gravel road to make it all smooth!

Now I’m ready to start painting on a new expression!
002
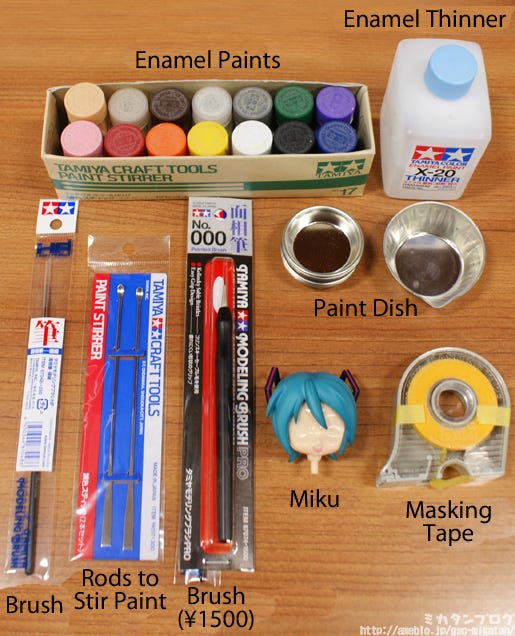
These are the tools of the trade!

The paints and thinner I’ll be using are enamel, which as I mentioned before is weaker than the lacquer. That means no matter how many times I paint and erase the base I’ve made, it won’t remove the lacquer that cleared the eyes away.

There are two different brushes you can see here, one that costs about ¥250 and then a more expensive one… so which one should you use? Oda-P says the cheaper one is just fine!! 😛
goodsmile company Mikatan's Blog English Version
Right, let’s draw in the border of the eyes!

By that I mean the red line in the image above.

I think getting that shape right might be one of the most difficult parts… I hope my Miku comes out looking cute!!
goodsmile company Mikatan's Blog English Version
The eye border is 1 part black and 4 parts brown paint!

Many of the earliest Nendoroid had a blacker eye border, but most of the recent ones actually use a brown color. The color looks much darker once its painted on, so if it looks a little too brown then its probably still fine!

I’ll be continuing tomorrow with the actual painting!

I’m really going to try my best to get this looking right, but if it turns out as a disaster, I hope you’ll all still cheer me on… ^^;
Anyway, that’s all for today!
I hope to see you all again tomorrow!! (・∀・)ノ゛
(C)Crypton Future Media, Inc. www.crypton.net

Miyazawa Model Exhibition

November 6th!

Twice every year it has become a routine to have a special business event for those in the figure industry, which is organized by Miyazawa Model – and today was the second one of this year!

001

It was raining quite hard today and those at the reception desk were very sympathetic… but soon after the reception we came to the GSC & Max Factory booth, still a bit wet from the rain.

But anyway, now it’s time to grab some photos of all the figures that were on display! There were even some first-time debut figures, so take your time and enjoy the figures as if you were at the event!

032

006

002

003

004

005

007

037

008

009

010

011

012

013

014

015

016

017

018

019

Did you see anything that caught your eye? A figure you’ve been hoping for?

This was actually the very first debut for this Nendoroid Fate-chan!! Everything on display here is well into development, so you should can look forward to them being officially announced shortly!

Now let’s take a look at the other booths!

There were a few things I noticed from looking at the products from other companies – firstly there are definitely a lot more chibi-style figures and secondly I’m seeing many more male figures aimed at the female figure fans!! It’s nice to see companies are starting to take interest in making figures for the girls! I’m often hoping to see figures of some of my favorite male characters… it should also hopefully mean that there should be more and more figure fans popping up!

020

021

022

023

024

025

026

027

028

029

030

031

033

034

036

035

That brings my Miyazawa Model Exhibition post to a close!

It was a bit of a rushed post, but I hope you all enjoyed it anyway! This really is one of my best events as it gives me a lot of time to carefully take a look at products from all the different companies!

We had a lot of staff at the event and it really left a strong impression on all of us! I’m sure we’ll be able to take this feeling and start work on a load of new products for everyone to enjoy!

But anyway, that’s all for today!
I hope to see you all again tomorrow!! (・∀・)ノ゛

Send in Your Catch Phrase Ideas for Nendoroid Sakura Miku’s Packaging!

Orders for Nendoroid Sakura Miku started back on Miku’s birthday!
007
A big thank you to everyone who has ordered her!!
She is currently in mass-production in order to get her to everyone, and I promise she’ll be arriving at your doorstep looking just as adorable as ever!
004
The packaging and box design is also currently in development, but haven’t you ever wondered who comes up with the catch phrases at the sides of the ‘window’ on the Nendoroid figure boxes?
It’s normally the job of the head planner!
Awhile back the design team used to be the ones who thought them up, but I think it makes much more sense for the planner who knows all about the product to come up with the text instead! Although there are also times that the publishers request something specific to be placed there too.
I think having the catch phrase right there on the front of the box is a great way to bring someone’s attention to a specific figure among all the different products that are lined up on the shelves.
But this time… Σ(゚ω゚*)
55
We’re requesting catch phrase ideas for Sakura Miku’s box from the fans!!
We’re going to be collecting together all the lovely ideas that all of you can come up with, and use the best ones on the final packaging for Sakura Miku! It’s the very first time we’ve run a project like this for a Nendoroid, it’s quite exiting to see what is going to come up!
Those who come up with the phrases we end up using will receive Nendoroid Sakura Miku for free!!
We’ll also put your name on the box!! However… unfortunately we’re only going to be able to accept entries in Japanese!
002
We’re looking for two different phrases!
The first is the left phrase on the front of the box, which must include “action figure”, and 13 other characters. The second is the right phrase on the front, which is completely up to you, but can only be 25 characters long.
They should be phrases that make you think of Sakura Miku!
005
Let’s look at some previous products as examples! (=゚ω゚)ノ
Nendoroid Sena Kashiwazaki from ‘Boku wa Tomodachi ga Sukunai’
Left: An action figure of the regrettable heroine!
Right: Perfect in every way, except her personality!
003
Nendoroid Nano Shinonome from Nichijou:
Left: A not-so-everyday action figure!
Right: The robot high school student living in the Shinonome labs!
001
Nendoroid Nyaruko from Haiyore! Nyaruko-san:
Left: A crawling chaos action figure, right by your side!
Right: The Nyarlathotepian dispatched to Earth!
The final “!” or “♪” at the end doesn’t need to be added into the character count, as we’ll add that in separately!
009
Nendoroid Sakura Miku Package Catch Phrase Entries
You can start sending entries in from later this week!
Once the entries have begun I’ll let everyone know on the blog! I can’t wait to see what entries come in! We’re expecting to run the entries for about 10 days, so you’ll have more than enough time to think up some clever phrases!!
Once again, we’re only accepting Japanese entries into the competition – sorry!
Anyway, that’s all for today!
I hope to see you all again tomorrow!! (・∀・)ノ゛
(C) Crypton Future Media, Inc. www.crypton.net

Nendoroid Miku Dayo

001
Da-dum… Da-dum…

002
Da-Dum-Da-Dum-Da-Dum…

003
She’s here━━(゚∀゚)━━!!!!

It’s been three months since we first saw this Nendoroid on display at WonFes, and the prototype has finally been completed for me to review on the blog!!
004
From Character Vocal Series 01: Hatsune Miku:
Nendoroid Miku Dayo!

From ‘Character Vocal Series 01: Hatsune Miku’ comes a Nendoroid of the conspicuous character based on Hatsune Miku, Miku Dayo! Her flappy twin-tails that became ever-popular at events have been faithfully recreated in Nendoroid size, and even move about in the same way as the original costume!


I’m sure there are a couple of you that are wondering who the heck this is… let me create a quick summary of how she was created!
(1) Sega made the ‘Project mirai’ game, featuring Nendoroid Vocaloids!
(2) A life-size Nendoroid Miku costume was made to promote the game!
(3) Everyone felt the costume didn’t quite feel like the real Miku!
(4) The costume Miku became her own character, Miku Dayo!
(5) Miku Dayo is made into a Nendoroid, completing the cycle!

That about sums it up! Those of you who are hearing about this for the first time may find it quite hard to believe, but this strange version of Miku has become loved just after appearing at a few events!
005
This is how she looks from the back!

Those of you who have seen the actual costume that created Miku Dayo will know just how amazing of a rendition this is!

The way her neck is all sunken down and covered by her head, the flappy twin-tails, the really long boots and the wrinkles on her back are all special characteristics that had to be reproduced on the Nendoroid! 😛
013
She looks so exited!

Both the costume and the Nendoroid can move in all sorts of ways, including her flappy twin-tails! I tried to create a running pose for this photo! (`・ω・´)
007
“Dayo-san chatting with someone!”

008
She comes with ball joints in her shoulders for a wider variety of arm poses compared to normal Nendoroids!

Thanks to that, you can pose her with her arms almost completely horizontal like this, or have them straight in front of her like the photo before this one! It’s kind of like just her arms were given the fully-posable ‘edition’ series treatment.

The reasoning behind it was of course to allow you to pose the Nendoroid in the same poses that the original costume takes!
009
She also comes with optional parts!

But, they’re still a secret!! (((゚Д゚)))

Phew, that was a close one, I nearly gave it away… Dayo-san would have been so angry with me!! The optional parts will be announced shortly!
010
Hi-yaa!!

012
Miku Dayo together with Nendoroid Miku!

It’s almost like a forbidden image to have both of them in the same photo… but it gives you a good feel for the differences. ^^;

I think Miku Dayo will have a load of fun playing with other Nendoroids and figures… I also hope that the colorful background will be included as the cardboard mat in the back of the packaging!
011
From Character Vocal Series 01: Hatsune Miku:
Nendoroid Miku Dayo!
She’ll be up for preorder shortly!!

Get in contact with our partner shops if you have any preorder or sales queries!
But that’s all for today!
I hope to see you all again next week!! (・∀・)ノ゛
(C) CFM/GSC/SEGA